How Long Does It Take a Mechanic to Replace a Control Arm
How long does it take a mechanic to replace a control arm? On average, the job takes between 1 and 3 hours per arm, depending on your vehicle model and condition. The total control arm replacement time can stretch longer if ball joints or bushings are seized. Understanding the process helps you plan your suspension repair and budget accordingly.
Your car’s control arm plays a huge role in how smoothly you ride. It connects your suspension to your steering system and keeps your wheels grounded. When it starts to wear out, you might notice strange noises, pulling to one side, or a rough ride. Many car owners wonder about the control arm replacement time before they commit to the repair. The answer depends on several factors, but most jobs are faster than you might think.
In this guide, we will walk through everything you need to know. We will cover the average time, what affects the duration, the step-by-step process, and the costs involved. Whether you are planning a shop visit or thinking about a DIY project, this article has you covered. Let us break it all down so you feel confident about your next suspension repair.
Key Takeaways
- Average Time: Most mechanics need 1 to 3 hours per control arm under normal conditions.
- Vehicle Matters: Older vehicles or those with rusted bolts can add extra time to the job.
- Cost Range: Total control arm cost typically runs between $150 and $400 per arm including parts and labor.
- Alignment Is Key: A wheel alignment is almost always needed after replacement to restore safe handling.
- DIY Option Exists: Experienced DIYers can save on labor, but the job requires proper tools and knowledge.
- Driving Risk: Ignoring a worn control arm can lead to dangerous steering failure on the road.
📑 Table of Contents
- What Does a Control Arm Do and Why Does It Wear Out?
- How Long Does It Take a Mechanic to Replace a Control Arm
- What Happens During the Control Arm Replacement Process
- Control Arm Replacement Cost and What Affects the Price
- What to Expect After Control Arm Replacement
- How Long Can You Drive on a Bad Control Arm?
- Tips to Make the Replacement Process Faster and Smoother
- Final Thoughts on Control Arm Replacement Time
What Does a Control Arm Do and Why Does It Wear Out?
How the Control Arm Works in Your Suspension System
The control arm is a vital part of your front suspension. It connects your steering knuckle to your vehicle frame. Think of it as a link between your wheels and the rest of the car. When you drive over bumps or turn corners, the control arm absorbs the force and keeps your tires planted on the road.
Most cars have upper and lower control arms in the front. Some vehicles use just one per wheel. The arm has a bushing on one end and a ball joint on the other. The bushing lets the arm flex, while the ball joint allows movement in multiple directions. Together, these parts give your car the range of motion it needs for smooth driving.
Over time, the rubber bushings crack and harden. The ball joint wears down too. Road salt, dirt, and moisture speed up this process. Drivers in harsh climates often see control arm wear earlier than others. Regular vehicle maintenance can help catch problems before they become serious.
Common Signs of a Worn Control Arm
Knowing the symptoms can save you from a dangerous breakdown. Here are the most common signs that your control arm needs attention:
- Clunking or popping noises when going over bumps or turning.
- Steering pull to the left or right while driving straight.
- Uneven tire wear on the inside or outside edges.
- Vibration in the steering wheel at highway speeds.
- Loose or wandering steering that feels less responsive.
- Visible damage like bent arms or torn rubber bushings.
If you notice any of these signs, get your car inspected soon. Driving on a bad control arm can cause further damage to your suspension components and compromise your safety.
How Long Does It Take a Mechanic to Replace a Control Arm
Average Labor Time for Control Arm Replacement
The short answer is that most mechanics finish one control arm in about 1 to 3 hours. For both front control arms, expect the shop to keep your car for roughly 2 to 5 hours total. This is the standard control arm replacement time for most common passenger vehicles.
The labor time varies based on your specific car. A straightforward job on a modern sedan usually falls on the lower end. Trucks, SUVs, and older vehicles often take longer. The condition of the bolts and fasteners also plays a big role. If rust has seized the nuts, the mechanic will need extra time to remove them safely.
Here is a general breakdown of what to expect:
- Front control arm (single): 1 to 2 hours
- Both front control arms: 2 to 4 hours
- Rear control arm: 1 to 3 hours (varies by vehicle)
- Combined with ball joint replacement: Add 30 minutes to 1 hour
These times assume the mechanic has the right tools and the parts are readily available. Rush jobs or shops with long wait times for parts can extend the total visit.
Factors That Affect Replacement Time
Several things can make the job take more or less time. Understanding these factors helps you set realistic expectations:
- Vehicle make and model: Some cars have easy access to the control arm. Others require removing additional components first.
- Rust and corrosion: Older vehicles or those driven in snowy regions often have seized bolts that need penetrating oil and patience.
- Bushing condition: If the bushing is completely destroyed, it may require special tools to press out and replace.
- Ball joint integration: Some control arms have the ball joint built in. Replacing the whole assembly is often faster than separating a worn ball joint.
- Mechanic experience: A skilled technician works faster and more efficiently than someone less familiar with the specific vehicle.
Also, if the mechanic discovers additional damage during the job, such as a worn tie rod end or damaged steering linkage, the time will increase. This is why it is smart to ask for a pre-inspection estimate before committing to the full repair.
What Happens During the Control Arm Replacement Process
Step-by-Step Breakdown of the Job
Knowing what the mechanic does during the job can help you feel more comfortable. Here is a simplified look at the process:
- Lift the vehicle and secure it on jack stands for safe access.
- Remove the wheel on the affected side to expose the suspension.
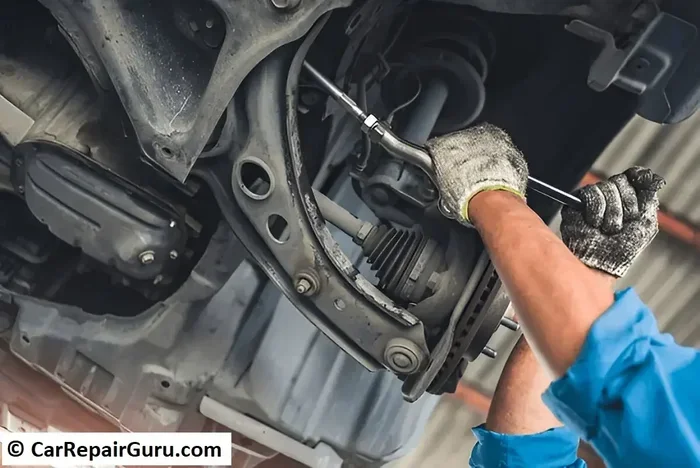
- Disconnect the ball joint from the steering knuckle using a ball joint separator tool.
- Remove the control arm bolts from the frame or subframe. This is often the most time-consuming step.
- Take out the old control arm and inspect surrounding components for damage.
- Install the new control arm by reversing the removal steps. Torque all bolts to factory specifications.
- Reinstall the wheel and lower the vehicle back to the ground.
- Perform a wheel alignment to ensure proper suspension geometry.
Step 4 is where things can slow down. If the bolts are rusted or stuck, the mechanic may need to apply penetrating oil, use heat, or try a breaker bar. This can add 30 minutes or more to the job. On newer vehicles with less corrosion, this step usually goes smoothly.
Tools and Equipment Needed
A proper control arm replacement requires more than just a wrench. The mechanic will typically need:
- Jack and jack stands or a lift
- Ball joint separator tool
- Torque wrench
- Penetrating oil (like WD-40 or PB Blaster)
- Breaker bar and socket set
- Control arm press (for bushing replacement)
- Wheel alignment machine
Without the right tools, the job takes longer and risks improper installation. This is another reason professional mechanics are often the better choice for this type of suspension repair.
Control Arm Replacement Cost and What Affects the Price
Breaking Down the Control Arm Cost
The total control arm cost includes both parts and labor. On average, you can expect to pay between $150 and $400 per control arm. The parts alone usually run from $50 to $200, while labor makes up the rest of the bill.
Here is a rough cost comparison based on vehicle type:
- Compact sedan: $150 to $250 per arm
- Mid-size SUV or truck: $200 to $350 per arm
- Luxury or performance vehicle: $250 to $400+ per arm
- Both front arms combined: Double the single-arm cost
If the ball joint is pressed into the control arm and needs separate replacement, add another $50 to $150. Some mechanics recommend replacing both arms at the same time, even if only one is bad. This saves on labor and ensures balanced handling.
DIY vs Professional Replacement
Some car owners ask whether they can do this job themselves. Compared to something simple like replacing a thermostat yourself, a control arm swap is more complex. It requires lifting the vehicle safely, using impact tools, and proper torque specs. The job also demands a wheel alignment afterward, which usually requires specialized shop equipment.
That said, experienced DIYers with a good garage setup can handle it. You will need a hydraulic jack, quality sockets, a ball joint tool, and a torque wrench. The biggest time savings come from having the right tools ready. Without them, you might spend more time on the job than a professional would.
For most people, taking the car to a trusted mechanic is the practical choice. The safety benefits of proper installation outweigh the savings from a DIY attempt.
What to Expect After Control Arm Replacement
Why Wheel Alignment Is Essential
After the new control arm is installed, your wheel angles will likely be off. The suspension geometry changes when you swap out a worn component. This is why a wheel alignment is almost always recommended right after the job. Skipping this step can lead to uneven tire wear and poor handling.
During the alignment, the technician adjusts your camber, caster, and toe angles. If you notice your car pulling to one side after the repair, it could mean the alignment is off. This is where checking whether your camber is out of alignment becomes important. A proper alignment ensures your new parts perform as intended and your tires last longer.
The alignment itself usually takes about 30 to 60 minutes. Many shops include this in the total labor cost, while others charge separately. Always ask for a clear estimate before the work begins.
Post-Replacement Inspection Checklist
A good mechanic will walk you through a few checks after the job is done. Here is what you should expect:
- Test drive: The mechanic should take the car for a short drive to check for noises or vibrations.
- Bolt inspection: All control arm bolts should be checked for proper torque.
- Steering check: The steering should feel tight and responsive with no play.
- Tire inspection: Look for even tread wear and proper tire pressure.
- Alignment confirmation: The alignment report should show all angles within factory specs.
Do not drive off if any of these checks are skipped. A thorough post-installation inspection protects your investment and keeps you safe on the road.
How Long Can You Drive on a Bad Control Arm?
The Risks of Delaying Replacement
Driving with a worn control arm is risky. The arm can fracture completely while you are driving, causing loss of steering control. Even a partially worn arm puts extra stress on your ball joints, tie rod ends, and suspension system. Over time, this leads to more expensive repairs.
Some drivers wonder how far they can push the repair. Unlike wondering how far past empty a car can go, driving on a bad control arm is not a matter of distance. It is a matter of safety. The arm could fail at any moment, especially under heavy braking or sharp turns.
If you must drive a short distance to a repair shop, do so slowly and carefully. Avoid highways, sharp turns, and rough roads. Get the car towed if the damage is severe. The cost of a tow is small compared to the risk of a steering failure at speed.
Temporary Fixes That Do Not Work
Some people try temporary fixes like tightening loose bolts or adding bushings. These are not real solutions. A worn control arm needs full replacement. Any temporary patch is a safety hazard and could fail without warning. Always replace the damaged part properly and get your suspension geometry checked afterward.
Tips to Make the Replacement Process Faster and Smoother
There are a few things you can do to help the process go smoothly when you visit the shop:
- Call ahead for an estimate: Ask about the expected labor time and cost before dropping off the car.
- Ask about parts availability: If the shop needs to order the control arm, the total wait time increases.
- Mention all symptoms: The more information you share, the better the mechanic can diagnose related issues.
- Request an alignment: Make sure the alignment is part of the service package.
- Get a written warranty: Ask about the warranty on both parts and labor before leaving the shop.
Being prepared saves time and prevents surprises. A good communication with your mechanic goes a long way toward a smooth repair experience.
Final Thoughts on Control Arm Replacement Time
The control arm replacement time typically ranges from 1 to 3 hours per arm, with most jobs wrapping up in a single day. The exact duration depends on your vehicle, the condition of the parts, and whether any related components need attention. What matters most is that the job is done right. A rushed replacement can lead to safety issues and additional repair costs down the road.
Whether you choose a professional shop or a DIY approach, understanding the process helps you make informed decisions. Budget for the parts, labor, and alignment. Do not skip the post-installation checks. Your control arm is a critical safety component, and taking the time to do the job properly is always worth it.
Stay on top of your automotive maintenance schedule. Catching suspension problems early saves money and keeps you safe. The next time you hear a clunk over a bump, do not ignore it. Get it checked and address the issue before it grows into something bigger.
Frequently Asked Questions
How much does it cost to replace a control arm?
The total cost typically ranges from $150 to $400 per control arm, including both parts and labor. Luxury vehicles and trucks tend to cost more. Getting a written estimate from your mechanic before the repair helps avoid surprises.
Can I drive with a bad control arm?
It is not safe to drive on a bad control arm. The arm can fail suddenly, causing loss of steering control. If you suspect a worn control arm, get it inspected and replaced as soon as possible to protect yourself and others on the road.
How do I know if my control arm needs to be replaced?
Common signs include clunking noises over bumps, steering pull, uneven tire wear, and vibration in the steering wheel. A mechanic can inspect the arm visually and check for excessive play in the ball joint and bushings to confirm the need for replacement.
Is it safe to replace a control arm myself?
Experienced DIYers with proper tools can handle this job, but it requires lifting the vehicle safely, using impact tools, and performing a post-installation alignment. If you lack the tools or experience, a professional mechanic is the safer choice.
Do I need a wheel alignment after replacing a control arm?
Yes, a wheel alignment is almost always necessary after a control arm replacement. The new part changes your suspension geometry, and an alignment ensures your tires wear evenly and your steering stays true. Skipping this step can lead to premature tire wear and handling problems.
How often should control arms be replaced?
Control arms typically last between 90,000 and 100,000 miles, but this varies by driving conditions. Harsh roads, winter salt, and heavy loads can shorten their lifespan. Regular suspension inspections during your vehicle maintenance schedule help catch wear early before it leads to more costly repairs.