Is Changing a Headlight Easy Yes Here Is How To Do It
Yes, changing a headlight is easy and something most car owners can do at home in under 30 minutes. This guide walks you through the entire process, from picking the right bulb to installing it correctly. You will save money, boost your night driving visibility, and feel confident working on your vehicle.
Have you ever been driving at night and realized one of your headlights is out? It is a scary and frustrating moment. You wonder if you need to rush to a mechanic or if you can handle it yourself. The good news is that changing a headlight is easier than most people think. You do not need to be a car expert to get the job done. In most cases, you can swap out a dead bulb in under 30 minutes right in your driveway.
This article will show you exactly how to change a headlight bulb step by step. We will cover everything from the tools you need to common mistakes you should avoid. Whether you drive a sedan, truck, or SUV, the process is very similar across most vehicles. By the end of this guide, you will feel confident tackling the job on your own. Headlight replacement does not have to be expensive or complicated anymore.
Let us be real for a second. A burned-out headlight is not just an inconvenience. It is a safety issue. Driving with one working headlight makes it harder for other drivers to see you at night. It can also lead to a traffic ticket in many states. So getting it fixed quickly is important. And the best part? You can save money by doing it yourself instead of paying a shop to do it for you.
Key Takeaways
- Changing a headlight is simple: Most vehicles make it easy to swap out a dead bulb without any special tools.
- You can do it yourself: With basic supplies and a few minutes, you can replace a headlight bulb at home.
- Safety comes first: Always disconnect the battery and wear protective gloves to avoid injury or damage.
- Choosing the right bulb matters: Match the bulb type, wattage, and size to your vehicle for the best results.
- Avoid common mistakes: Don’t touch the glass with bare hands and always test the new bulb before closing everything up.
- Know when to call a pro: If the headlight housing is cracked or the wiring is damaged, a mechanic is your best bet.
📑 Table of Contents
- Why Do Headlights Go Bad?
- Tools and Supplies You Will Need
- Step-by-Step Guide to Changing a Headlight
- Common Mistakes People Make When Changing a Headlight
- How to Choose the Right Headlight Bulb
- When Should You Call a Professional?
- Tips for Better Night Driving Visibility
- How Long Does It Take to Change a Headlight?
- Cost of Changing a Headlight Bulb Yourself
- Final Thoughts on Headlight Replacement
Why Do Headlights Go Bad?
Headlight bulbs do not last forever. Over time, the filament inside the bulb wears out from normal use. But several factors can speed up this process. Understanding why headlights fail helps you prevent it from happening too soon.
Normal Wear and Tear
Every time you turn on your headlights, the filament inside the bulb heats up and cools down. After thousands of hours of use, this thin filament eventually breaks. Most headlight bulbs last between 450 and 1,000 hours depending on the type. So if you drive at night often, you may notice a bulb dimming or going out after a year or two.
Vibration and Road Conditions
Every time you drive over bumps and potholes, your headlights vibrate. This constant shaking can weaken the filament over time. Trucks and vehicles that carry heavy loads experience even more vibration. This is one reason some drivers notice bulbs dying sooner than expected.
Moisture and Corrosion
Moisture can sneak into the headlight housing through small cracks or loose seals. When water gets inside, it can cause corrosion on the bulb socket and electrical connections. This leads to poor contact and eventual bulb failure. Keeping your headlight cover and seals in good shape helps prevent this problem.
Electrical Issues
Sometimes the problem is not the bulb itself. A blown fuse, a faulty relay, or a loose socket connector can cause a headlight to stop working. Before you replace the bulb, it is worth checking these components too. A simple headlight test with a multimeter can help you identify electrical problems fast.
Tools and Supplies You Will Need
One of the best things about headlight replacement is that you do not need a lot of fancy tools. Most of what you need, you probably already have at home. Here is a simple list of supplies to gather before you start.
- Replacement headlight bulb – Make sure it matches your vehicle’s specifications.
- Protective gloves – These keep oils from your skin off the new bulb glass.
- Clean cloth or paper towel – For handling the bulb safely.
- Screwdriver set – Usually a Phillips or flat-head, depending on your vehicle.
- Safety glasses – To protect your eyes from any debris.
- Owner’s manual – This is your best friend for finding the exact bulb location.
- Battery terminal wrench – Optional but recommended for safety.
You do not need any special electrical tools or expensive equipment. The entire process is designed to be simple. If you can unscrew a few bolts and pull a connector, you can change a headlight. Vehicle maintenance tasks like this are meant to be accessible to everyday car owners.
Step-by-Step Guide to Changing a Headlight
Now let us get into the actual process. Follow these steps carefully and you will have a working headlight in no time. The process is the same whether you are replacing a low beam, high beam, or fog light.
Step 1: Park Your Vehicle Safely
Find a flat, level surface to park on. Turn off the engine and remove the keys from the ignition. Engage the parking brake so the car does not roll. If you are working at night, park in a well-lit area so you can see what you are doing clearly.
Step 2: Locate the Headlight Assembly
Open the hood and find the back of the headlight assembly. The headlight housing sits behind the front grille. In most vehicles, you will see a plastic cover or a rubber gasket at the back of the headlight. This is where you access the bulb.
Your owner’s manual will show you the exact location. Some vehicles have easy access from the engine bay. Others require you to reach in from behind the front bumper. Knowing this ahead of time saves you a lot of frustration.
Step 3: Disconnect the Battery
This is an important safety step. Use your wrench to loosen the negative battery terminal and pull it off. This prevents any electrical shorts while you work. It only takes a few seconds and it protects both you and your vehicle’s electrical system.
Step 4: Remove the Old Bulb
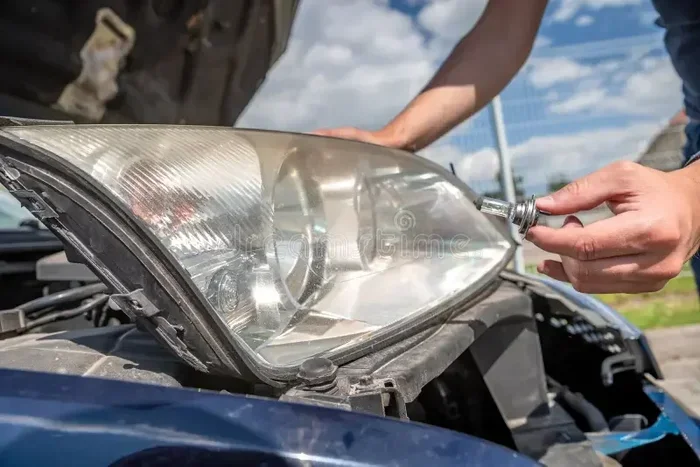
Unplug the electrical connector from the back of the bulb. You may need to press a small tab or clip to release it. Next, remove any retaining clips or rings that hold the bulb in place. Carefully pull the old bulb straight out. Do not force it. If it feels stuck, double-check that you have removed all the clips.
Here is a pro tip. Never touch the glass part of the new bulb with your bare fingers. The oils from your skin create hot spots on the bulb when it heats up. This can cause the bulb to shatter or burn out much faster. Always hold the bulb by the plastic base or wear gloves.
Step 5: Install the New Bulb
Take your new headlight bulb out of the packaging using a clean cloth or paper towel. If your vehicle uses a halogen headlight, be extra careful not to touch the glass. For LED headlights, the same rule applies. Hold the bulb by the base and gently insert it into the socket.
Push the bulb in until it seats properly. Reattach the retaining clip or ring to secure it. Plug the electrical connector back in until you hear a click. Everything should feel snug and secure.
Step 6: Test the New Headlight
Before you close everything up, turn on your vehicle and test the new headlight. Switch between low beam and high beam to make sure both work. Look at the beam pattern. If one side seems dimmer or misaligned, you may need to adjust the headlight alignment later.
Step 7: Reassemble and Clean Up
Once the new bulb works, put the plastic cover or rubber gasket back in place. Reconnect the negative battery terminal. Close the hood and go for a quick test drive around the block. Make sure both headlights work properly and the beam pattern looks correct on the road.
Common Mistakes People Make When Changing a Headlight
Even though changing a headlight is easy, mistakes can happen. Here are the most common errors and how to avoid them.
- Touching the bulb glass with bare hands: Skin oils shorten bulb life dramatically. Always use gloves or a clean cloth.
- Forgetting to disconnect the battery: This can cause electrical shorts or blown fuses. Always disconnect the negative terminal first.
- Installing the wrong bulb type: Not all bulbs fit all vehicles. Check your owner’s manual or look up your vehicle’s specifications before buying.
- Not testing before closing up: If you assemble everything and then discover the bulb is dead or the connector is loose, you have to start over.
- Ignoring a cracked housing: If the headlight assembly is damaged, a new bulb alone will not fix the problem. Moisture and dirt will get in.
- Reusing old clips or connectors: Worn clips can cause the bulb to rattle loose over time. Replace damaged parts when needed.
Avoiding these mistakes saves you time and prevents headaches. A little care goes a long way with headlight bulb replacement.
How to Choose the Right Headlight Bulb
Not all headlight bulbs are the same. Picking the right one for your vehicle is essential for proper fit and performance. Here is how to make sure you get the correct bulb.
Check Your Owner’s Manual
Your vehicle’s owner’s manual lists the exact bulb type, wattage, and size for each headlight. This is the most reliable source of information. Write down the part number before you go shopping.
Know Your Bulb Types
There are several types of car headlight bulbs on the market today. Halogen bulbs are the most common and affordable. They produce a warm yellowish light. LED headlights are more energy-efficient and last much longer. They produce a bright white light that improves night driving visibility.
Xenon or HID bulbs are another option. They produce an intense blue-white light. However, they require a ballast and are more complex to install. For most DIYers, halogen headlight or LED headlight bulbs are the best choice for easy replacement.
Match the Wattage
Always match the bulb wattage to what your vehicle requires. Using a bulb with too high a wattage can overload the electrical system. Using one that is too low can result in weak light output. The correct bulb wattage ensures safe and effective operation.
Consider Beam Pattern
The shape of the beam pattern matters for road safety. Some bulbs produce a focused beam for long-distance visibility. Others spread the light wider for better peripheral vision. Choose a bulb that matches your driving needs and complies with local regulations.
When Should You Call a Professional?
DIY headlight replacement works great for most situations. But there are times when calling a mechanic is the smart move. Here is when you should consider professional help.
- The headlight housing is cracked or broken: A cracked housing lets moisture in and affects the beam pattern. Replacing the entire assembly requires special tools and knowledge.
- The wiring is damaged or corroded: If you notice frayed wires or corroded connectors, a mechanic can safely repair the electrical system.
- The fuse keeps blowing: A recurring blown fuse signals a deeper electrical problem that needs professional diagnosis.
- You cannot access the bulb: Some vehicles have tight engine bays where reaching the bulb is extremely difficult. A mechanic has the right tools and experience.
- You are uncomfortable working on your vehicle: There is no shame in asking for help. A quick trip to the shop costs less than you might think.
Knowing your limits is part of smart vehicle maintenance. If something feels beyond your skill level, trust your instincts and seek professional help.
Tips for Better Night Driving Visibility
Once you have replaced your headlight, you can take extra steps to improve your visibility on the road. These simple tips make a big difference for night driving visibility.
- Clean your headlight covers regularly: Dirt and haze reduce light output significantly. Use a headlight restoration kit for cloudy covers.
- Check both headlights together: If one bulb is old, the other is probably close to dying too. Replace them as a pair for even lighting.
- Adjust your headlight alignment: Over time, headlights can shift from their proper aim. Check alignment at least once a year.
- Keep your windshield clean: A dirty windshield scatters light and creates glare. Clean both the inside and outside regularly.
- Use high beams when safe: On dark roads with no oncoming traffic, high beams give you much better visibility.
These small habits keep you safer on the road and extend the life of your headlight assembly. They are easy to do and make a noticeable difference.
How Long Does It Take to Change a Headlight?
For most vehicles, the entire process takes between 15 and 30 minutes. If you have easy access to the bulb from the engine bay, it can be even faster. Some cars require you to work from behind the front bumper, which adds a few extra minutes.
The key factors that affect the time include your vehicle model, bulb access, and your comfort level with basic car maintenance. If it is your first time, give yourself about an hour to be safe. You will get faster with practice.
Roadside safety is another reason to learn this skill. If your headlight goes out on a road trip or late at night, you can fix it quickly without waiting for a tow truck or spending money at a repair shop. Knowing how to handle basic maintenance tasks gives you confidence and independence as a car owner.
Cost of Changing a Headlight Bulb Yourself
One of the biggest advantages of DIY headlight replacement is the cost savings. A replacement bulb typically costs between $15 and $50 depending on the type and brand. LED bulbs tend to cost more upfront but last much longer than halogen options.
If you take your car to a shop, the total cost including labor can range from $75 to $200 or more. That is a significant difference for a task that takes less than half an hour. Changing a headlight yourself is one of the easiest ways to save money on car maintenance.
Final Thoughts on Headlight Replacement
So to answer the question directly, is changing a headlight easy? Yes, absolutely. It is one of the simplest and most rewarding DIY car maintenance tasks you can do. You do not need special training, expensive tools, or a lot of experience. With the right bulb, a few basic supplies, and this guide, you can replace a dead headlight in minutes.
The process follows a clear and logical sequence. Disconnect the battery, access the old bulb, remove it carefully, install the new one, and test it. That is it. Once you have done it the first time, you will feel much more confident handling other simple maintenance tasks on your vehicle.
Do not let a burned-out headlight sit for too long. It compromises your safety and the safety of everyone on the road. Grab your replacement bulb, follow the steps in this guide, and get back to driving with full visibility tonight. Headlight replacement is a small job that makes a big difference.
Take pride in handling your own vehicle maintenance. Every task you complete on your own builds your skills and saves you money in the long run. So go ahead, pop the hood, and change that headlight. You have got this.
Frequently Asked Questions
Can I change a headlight bulb without disconnecting the battery?
Yes, you can in most cases. However, disconnecting the battery is a recommended safety step. It prevents electrical shorts and protects your vehicle’s wiring. The process is quick and easy, so there is no reason to skip it.
How long do headlight bulbs typically last?
Most headlight bulbs last between 450 and 1,000 hours of use. Halogen bulbs tend to last around 450 to 500 hours. LED bulbs can last 3,000 hours or more. Your driving habits and road conditions also affect bulb life.
Can I touch the new headlight bulb with my bare hands?
You should avoid touching the glass part of the bulb with bare fingers. The oils from your skin create hot spots that can cause the bulb to fail prematurely. Always use gloves or a clean cloth when handling a new headlight bulb.
Do I need to replace both headlight bulbs at the same time?
It is a good idea to replace both bulbs at the same time. If one bulb has burned out, the other is likely close to failing too. Replacing them as a pair ensures even lighting and saves you time in the long run.
What is the difference between halogen and LED headlight bulbs?
Halogen headlight bulbs are the most common and affordable. They produce a warm yellowish light. LED bulbs are more energy-efficient, brighter, and last much longer. LED bulbs cost more upfront but save money over time because they do not need to be replaced as often.
How do I know which headlight bulb fits my vehicle?
Check your vehicle’s owner’s manual for the exact bulb type and size. You can also look up your vehicle’s make, model, and year online. Auto parts stores can help you find the right bulb using your vehicle information. Always match the bulb to your specifications for proper fit and performance.