DIY: How to Polish Auto Glass for Crystal Clear Results
Polishing your auto glass at home is easier than you think and can save you hundreds of dollars. This guide walks you through every step needed to restore crystal clear visibility on your windshield and car windows. You will learn the right tools, proper techniques, and common mistakes to avoid for professional-grade results.
There is something deeply satisfying about looking through a windshield that feels like glass from a brand new car. Over time, auto glass collects scratches, haze, and stubborn swirl marks that cloud your view. These imperfections do more than just look bad. They can seriously affect your visibility, especially at night or in heavy rain.
The good news is that you do not need a professional detailer to fix this. Polishing auto glass is a skill you can learn quickly at home. With the right tools and a bit of know-how, you can bring back that factory-fresh clarity in just a couple of hours. This guide covers everything from choosing the right supplies to the final finishing touches.
Whether your windshield has light surface scratches or a more stubborn haze, the process is the same. The key is patience and following the correct steps in order. Skip ahead and you risk making the problem worse. Stick with us, and by the end of this article, you will feel confident tackling the job yourself.
Key Takeaways
- You can polish auto glass at home with basic tools and a little patience, no professional skills needed.
- Choosing the right polishing compound and pad makes a huge difference in the final clarity of your glass.
- Proper surface preparation is the most overlooked step that determines the success of your polish.
- Working in small sections with even pressure prevents swirl marks and ensures a uniform finish.
- Applying a UV protectant after polishing extends the life of your work and improves driving safety.
- Avoiding common mistakes like using the wrong grit or skipping the cleaning stage saves time and effort.
- Regular maintenance polishing keeps your auto glass looking new and extends its overall lifespan.
📑 Table of Contents
- Why Auto Glass Gets Damaged Over Time
- Tools and Materials You Will Need
- Step-by-Step Guide to Polish Auto Glass
- Common Mistakes to Avoid
- How Often Should You Polish Your Auto Glass
- When to Call a Professional Instead
- Benefits of Polishing Auto Glass Yourself
- Quick Tips for the Best Results
- Final Thoughts
Why Auto Glass Gets Damaged Over Time
Understanding what causes damage to your glass helps you prevent it in the future. Most people think only accidents cause scratches. But the truth is, daily driving exposes your windshield to a lot of wear and tear.
Environmental Factors
Sunlight, rain, road salt, and airborne dust all play a role. UV rays slowly break down the surface of your glass, causing a chalky, hazy appearance. Acid rain can etch the surface over time, leaving tiny pits that scatter light. If you park outside frequently, your windshield takes the brunt of all these elements.
Wiper Blades and Debris
Worn wiper blades are one of the biggest culprits. When the rubber hardens or cracks, it no longer glides smoothly. Instead, it drags dirt and metal particles across the glass, creating fine scratches. Dust and sand kicked up by other vehicles also contribute to surface damage every time you drive.
Chemical Contaminants
Bug splatter, tree sap, and bird droppings are more than just nuisances. They contain acids that eat into the glass surface if left too long. Even regular car wash chemicals can leave a thin film that dulls the glass over months and months of exposure.
Tools and Materials You Will Need
Before you start, gather everything you need. Having the right tools on hand makes the job smoother and the results much better. You do not need anything exotic or expensive, but you do need quality products.
Essential Polishing Supplies
- Glass polishing compound — Choose a compound specifically designed for automotive glass, not paint.
- Microfiber cloths — You need at least three or four clean ones for different stages of the process.
- Polishing pad or foam applicator — A soft foam pad works best for glass surfaces.
- Plastic razor blade or glass scraper — This helps remove stubborn residue before polishing.
- Glass cleaner — A streak-free cleaner is essential for prepping the surface.
- Tape and mask — Use painter’s tape to protect rubber seals and trim around the glass.
- UV glass protectant — This seals and protects your work after polishing.
Optional but Helpful Tools
- Dual-action polishing machine — This speeds up the process significantly for larger areas.
- Spray bottle with distilled water — Keeps the surface lubricated during hand polishing.
- Headlamp or flashlight — Helps you spot scratches and swirl marks more easily.
- Detailing brush — Useful for cleaning edges and corners before you begin.
Step-by-Step Guide to Polish Auto Glass
Now for the part you have been waiting for. Follow these steps carefully and in order. Each one builds on the previous step, so skipping around will hurt your results.
Step 1: Clean the Glass Thoroughly
Start by washing the entire windshield and all windows you plan to polish. Use a quality glass cleaner and a clean microfiber cloth. Remove all dirt, dust, and grime. Any particles left on the surface will get ground into the glass during polishing, creating new scratches.
Pay special attention to the edges and corners where buildup tends to collect. Use a detailing brush to gently clean the rubber seals around the windshield. Once the glass is clean, dry it completely with a fresh microfiber towel.
Step 2: Inspect the Glass Closely
Grab your flashlight or headlamp and examine the glass from different angles. Look for scratches, haze, swirl marks, and any areas that look cloudy or uneven. This inspection tells you how much work lies ahead and helps you decide which grit of polishing compound to start with.
Light surface scratches usually respond well to a fine compound. Deeper scratches may require starting with a more abrasive compound and working down to finer grades. Knowing what you are dealing with prevents you from wasting time and product.
Step 3: Protect the Surrounding Areas
This step is easy to skip but very important. Use painter’s tape to mask off the rubber seals, plastic trim, and any painted surfaces near the glass. Polishing compound can stain or damage these materials if it splashes onto them.
Take your time with this step. A few extra minutes of taping now saves you from a lot of cleanup and potential damage later. Make sure the tape is pressed down firmly along the edges so no compound seeps underneath.
Step 4: Apply the Polishing Compound
Put a small amount of polishing compound onto your foam applicator pad. Less is more here. You only need a thin, even layer to cover a small section at a time. About the size of a quarter is plenty for each pass.
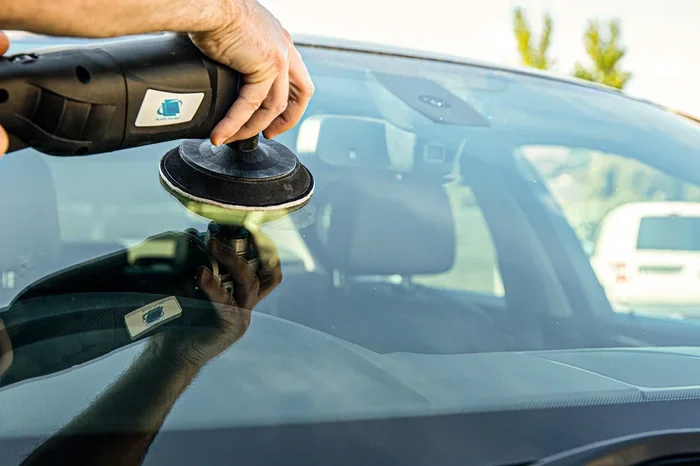
If you are using a polishing machine, set it to a low or medium speed. Too much speed generates excess heat, which can damage the glass or the surrounding rubber. For hand polishing, just use your fingers to spread the compound in gentle, overlapping circles.
Step 5: Polish in Small Sections
Work on one small section at a time, about 12 inches by 12 inches. This keeps the compound from drying out before you finish. Use steady, even pressure and move in overlapping circular motions.
For machine polishing, keep the pad flat and move slowly. Let the compound do the work. Do not press too hard. For hand polishing, use your full palm and apply gentle, consistent pressure. You will feel the compound grab and then smooth out as the section comes clean.
Check your progress frequently by wiping the section with a clean cloth. You should see the haze and scratches fading with each pass. If a section is not improving, you may need to switch to a more abrasive compound or add more lubrication.
Step 6: Remove Residue and Inspect
Once you have polished the entire windshield, wipe it down with a clean, damp microfiber cloth. This removes all traces of the polishing compound. Then dry the glass with a separate clean towel.
Now comes the moment of truth. Hold your flashlight at a low angle across the glass and look for any remaining scratches or haze. If you still see imperfections, you may need to repeat the process with a finer compound. Most glass responds well to two passes, one with a medium compound and one with a fine one.
Step 7: Apply UV Protectant
This final step seals your hard work and adds a layer of protection. Apply a UV glass protectant according to the product instructions. Usually, you just spray it on and wipe it off with a clean microfiber cloth.
The protectant does two important things. First, it adds a hydrophobic layer that helps water bead off the windshield, improving visibility in the rain. Second, it shields the glass from future UV damage, keeping it clear for longer.
Common Mistakes to Avoid
Even with the best intentions, it is easy to make mistakes when polishing auto glass. Here are the most common ones and how to avoid them.
- Using the wrong compound. Paint polishing compounds are too abrasive for glass. Always use a product formulated specifically for automotive glass.
- Skipping the cleaning step. Dirt left on the surface gets pressed into the glass by the polishing pad. This creates new scratches and ruins the finish.
- Applying too much pressure. Let the compound and pad do the work. Heavy pressure does not speed things up and can cause uneven results.
- Polishing in direct sunlight. The heat causes the compound to dry too fast, leaving a residue that is very hard to remove.
- Not using enough lubrication. Dry polishing generates friction and heat, which can crack or stress the glass.
- Rushing the process. Polishing takes time. Hurrying through the steps leads to missed spots and incomplete results.
How Often Should You Polish Your Auto Glass
Most drivers benefit from a glass polish once or twice a year. If you park outdoors or drive in harsh conditions, you may need to do it more frequently. Signs that your glass needs attention include increased glare at night, a persistent hazy film that will not wash off, and visible scratches that interfere with your line of sight.
Regular maintenance polishing keeps the glass in great shape between deeper treatments. A quick polish with a fine compound and a UV protectant every few months goes a long way. It is a small investment of time that pays off in better visibility and a longer lifespan for your windshield.
When to Call a Professional Instead
DIY polishing works great for surface scratches, haze, and swirl marks. But it cannot fix everything. Deep chips, cracks that go through the glass layers, or damage from impact should be handled by a professional. Attempting to polish cracked glass can make the damage worse and compromise the structural integrity of your windshield.
If you are unsure whether a scratch is surface-level or deep, run your fingernail across it. If your fingernail catches, the scratch is likely too deep for polishing. In that case, seek professional help. A qualified auto glass technician can assess the damage and recommend the right repair or replacement.
Benefits of Polishing Auto Glass Yourself
There are many reasons to take on this project yourself. The most obvious one is cost. Professional glass polishing can cost anywhere from $100 to $300 or more, depending on the extent of the damage. Doing it yourself costs a fraction of that, and you keep the savings.
Beyond the savings, there is the satisfaction of doing it yourself. You control the process, the products, and the timeline. You can take your time and make sure every section gets the attention it deserves. Plus, once you learn how to polish auto glass properly, you can maintain your results and keep your windshield looking great year after year.
Another benefit is improved safety. Clear, scratch-free glass gives you better visibility in all driving conditions. This is especially true at night when headlights and streetlights reflect off imperfections in the glass. A polished windshield reduces glare and helps you see the road more clearly.
Quick Tips for the Best Results
- Always work in a shaded area or in a garage to avoid direct sunlight.
- Use distilled water for mixing and cleaning. Tap water leaves mineral spots that can interfere with polishing.
- Change your microfiber cloth frequently. A dirty cloth reintroduces debris to the glass surface.
- Take before-and-after photos to track your progress and stay motivated.
- Warm the glass slightly with a heat gun or warm cloth before polishing. This helps the compound work more effectively.
- Invest in quality microfiber towels. Cheap cloths leave lint and can reintroduce scratches.
- Be patient. The best results come from slow, careful work rather than rushing to finish.
Final Thoughts
Polishing auto glass at home is one of the most rewarding DIY car maintenance tasks you can take on. It does not require expensive equipment or years of experience. With the right supplies, a little time, and the steps outlined in this guide, you can transform a cloudy, scratched windshield into one that looks as good as new.
The key is to take it step by step. Do not rush. Do not skip preparation. And do not use the wrong products. Follow the process, be patient, and you will see a noticeable difference in your glass clarity and driving visibility.
Now that you know how to polish auto glass properly, there is nothing stopping you from getting started today. Your windshield works hard every day to keep you safe. Give it the care it deserves and enjoy the open road with crystal clear vision.
Frequently Asked Questions
Can I use car wax instead of a glass polishing compound?
No, car wax is formulated for paint surfaces and is not designed for glass. It can leave a filmy residue that reduces visibility. Always use a polishing compound specifically made for automotive glass to get the best results.
How long does it take to polish auto glass at home?
For a single windshield, plan on about one to two hours depending on the condition of the glass. If you are polishing all the windows on your car, set aside a half day. The more practice you get, the faster the process becomes.
Will polishing remove deep scratches from my windshield?
Polishing can remove light to moderate surface scratches. Deep scratches that catch your fingernail usually cannot be fully removed through polishing alone. In those cases, a professional repair or windshield replacement may be necessary.
Can I polish auto glass in the sun?
It is best to avoid polishing in direct sunlight. The heat causes the polishing compound to dry too quickly, which leaves residue and makes it harder to achieve a smooth, clear finish. Work in a shaded area or a garage for the best results.
Is a polishing machine necessary, or can I do it by hand?
You can absolutely polish auto glass by hand. A machine makes the process faster and more uniform, but hand polishing gives you more control and works well for smaller areas or touch-ups. Many people achieve excellent results without ever using a machine.
How often should I reapply UV protectant after polishing?
Most UV protectants last between two and three months with regular driving. You can reapply whenever you notice water no longer beading off the glass as well as it used to. Regular reapplication keeps your glass protected and maintains the hydrophobic effect.
=== CONCLUSION ===
Polishing auto glass is a simple yet impactful DIY project that anyone can do. It saves money, improves safety, and gives you a sense of accomplishment. With the right tools, the correct technique, and a bit of patience, your glass can look absolutely flawless.
Remember to take your time, follow each step carefully, and avoid the common mistakes outlined above. The difference between a cloudy windshield and a crystal clear one is just a few hours of focused work. Start today, and you will wonder why you did not try it sooner.