How Do You Change Car Oil for Beginners Simple Steps
Changing your own oil is one of the easiest and most rewarding DIY car maintenance tasks you can do. This guide walks you through every step of the change car oil process, from gathering tools to disposing of old oil properly. You will learn how to pick the right oil, avoid common mistakes, and save money on every oil change.
Changing your own change car oil might sound intimidating at first. But the truth is, it is one of the simplest maintenance jobs you can do at home. With a few basic tools and about thirty minutes, you can complete the entire process. This guide is designed for absolute beginners who have never changed oil before. You will learn everything from gathering supplies to safely disposing of the old oil.
Many car owners pay shops $50 or more for a simple oil change. When you do it yourself, you control the quality of the oil and the speed of the service. Plus, you gain a better understanding of your vehicle. That knowledge builds confidence and saves you money over time. Whether you drive a sedan, truck, or SUV, the basic process is very similar across most vehicles.
This article covers every detail you need to know. We will walk through the tools you need, the step-by-step process, how to choose the right oil, and common mistakes to avoid. By the end, you will feel ready to tackle your first DIY oil change with ease.
Key Takeaways
- Changing your own oil saves money: You can cut costs significantly by doing it yourself instead of visiting a shop.
- You need basic tools: A socket wrench, oil filter wrench, drain pan, and jack stands are all you need to get started.
- Choosing the right oil matters: Synthetic and conventional oils serve different engines, and picking the correct viscosity is essential.
- Safety comes first: Always use jack stands and let the engine cool before starting the oil change process.
- Proper disposal is important: Never dump old oil. Take it to a recycling center or auto parts store for safe disposal.
- Regular oil changes protect your engine: Staying on top of your oil change interval keeps your engine running smoothly for years.
📑 Table of Contents
Why Changing Your Own Oil Matters
Save Money on Every Oil Change
The biggest reason people learn to change car oil at home is cost. A typical shop charge ranges from $40 to $75 per oil change. If you change your oil twice a year, that adds up to $80 to $150 annually. When you buy your own oil and filter, the cost drops to around $20 to $40 per change. That is real savings over time.
But saving money is not the only benefit. When you do it yourself, you know exactly what goes into your engine. You choose the oil brand, the viscosity, and the filter quality. No upsells, no surprises. You also learn how your vehicle works, which helps you spot other issues early.
Build Confidence and Car Knowledge
Every time you complete a maintenance task, your confidence grows. Changing oil is a perfect starting point because it is straightforward and low-risk. Once you master this skill, you may feel more comfortable tackling other jobs. Things like replacing air filters, checking brake pads, or swapping out spark plugs become less scary.
Knowing your car also helps you communicate better with mechanics. When you do visit a shop, you understand what they are recommending and why. That puts you in a stronger position and helps you avoid unnecessary repairs.
Tools and Materials You Will Need
Essential Tools for the Job
Before you start, gather everything you need. Having all your tools ready makes the process smooth and fast. Here is what you will need:
- Socket wrench and the correct size socket for your drain plug
- Oil filter wrench to remove the old oil filter
- Jack stands or a ramp to safely lift the vehicle
- Oil drain pan to catch the old oil
- Funnel for pouring new oil without spills
- Torque wrench to tighten the drain plug to the right specification
- Gloves and safety glasses to protect your hands and eyes
- Rags or paper towels for cleanup
Choosing the Right Oil and Filter
Check your owner’s manual for the recommended oil type and capacity. Most vehicles use either conventional oil or synthetic oil. Synthetic oil performs better in extreme temperatures and lasts longer, but it costs more. Conventional oil is more affordable and works well for everyday driving.
You also need to match the oil viscosity to your engine. Viscosity refers to how thick the oil is at different temperatures. Common grades include 5W-30, 10W-30, and 0W-20. The number before the W measures cold-temperature performance, and the number after measures hot-temperature performance. Using the wrong viscosity can affect engine protection.
For the oil filter, look for a quality brand that matches your vehicle model. A good filter traps contaminants and keeps your engine clean. If you are unsure which filter to buy, ask at your local auto parts store and provide your vehicle details.
Gathering Your Supplies
Beyond tools and oil, you will need a few extras. A drain pan is essential for catching the old oil. You do not want it spilling on your driveway or garage floor. Some people place cardboard or a tarp underneath the car for extra protection. You will also want a container for transporting the used oil to a recycling center.
Keep a record of your oil change date and mileage. This helps you track your oil change interval and stay on schedule. Many people use a simple notebook or a phone app for this purpose.
Step-by-Step Oil Change Guide
Step One: Prepare the Vehicle
Start by parking your car on a flat, level surface. Engage the parking brake and turn off the engine. Let the car cool for at least ten minutes. Warm oil drains better than cold oil, but you do not want to burn yourself on hot components.
If your vehicle has a low ground clearance, you may need to lift the front end. Use a hydraulic jack to raise the car, then place jack stands on the designated lift points. Never rely on a jack alone. Jack stands provide the stability you need to work safely underneath the vehicle.
Step Two: Locate the Drain Plug and Oil Filter
Crawl underneath the car and find the oil drain plug. It is usually located at the bottom of the oil pan, near the front or back of the engine. The oil filter is typically located on the side or bottom of the engine block. Refer to your owner’s manual if you are unsure of the exact locations.
Place your drain pan directly beneath the drain plug. Make sure it is large enough to hold all the old oil. Most cars hold between four and six quarts of oil, so use a pan that can accommodate that volume.
Step Three: Drain the Old Oil
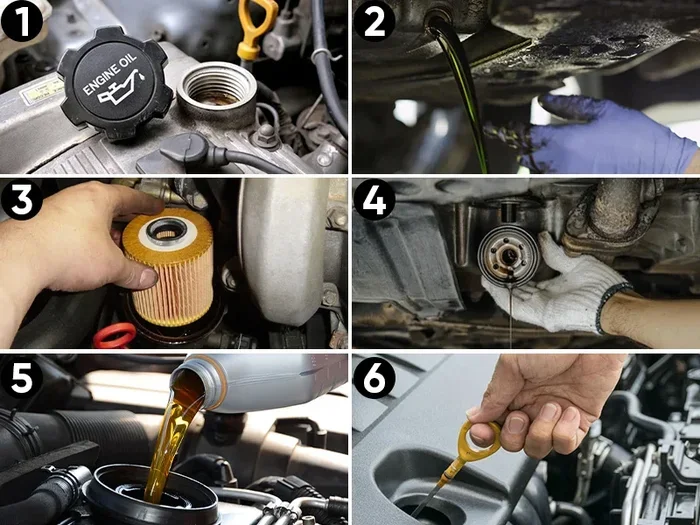
Using your socket wrench, slowly loosen the drain plug by turning it counterclockwise. Be careful not to strip the plug. Once it is loose, finish removing it by hand and let the oil flow into the drain pan.
Wait for the oil to stop dripping. This usually takes about five to ten minutes. While you wait, check the drain plug washer. If it looks worn or damaged, replace it before reinstalling the plug. A fresh washer ensures a tight seal and prevents leaks.
Step Four: Remove the Old Oil Filter
Position your drain pan under the oil filter. Use your oil filter wrench to loosen the old filter by turning it counterclockwise. Old filters can be tight, so apply steady pressure. Be prepared for some residual oil to spill out once the filter comes loose.
Before installing the new filter, lightly coat the rubber gasket with a little bit of new oil. This helps create a proper seal and makes future removal easier. Screw the new filter on by hand until the gasket contacts the engine, then tighten it slightly with the wrench. Do not overtighten, as this can damage the gasket.
Step Five: Reinstall the Drain Plug
Once all the oil has drained, reinstall the drain plug. Thread it in by hand first to avoid cross-threading. Then use your torque wrench to tighten it to the manufacturer’s specification. Over-tightening can strip the threads or crack the oil pan, so always follow the recommended torque value.
Step Six: Add New Oil
Remove the oil fill cap on top of the engine. Place a funnel in the opening and pour in the new oil slowly. Add about three-quarters of the recommended amount first, then check the level with the dipstick. Add more oil gradually until the level falls between the minimum and maximum marks on the dipstick.
After filling, replace the oil fill cap and start the engine. Let it run for about thirty seconds, then check underneath for leaks. If you see any drips around the drain plug or filter, turn off the engine and address the issue before driving.
Step Seven: Check the Oil Level and Clean Up
Turn off the engine and wait a few minutes for the oil to settle. Pull the dipstick, wipe it clean, reinsert it, and check the level again. The oil should be between the two marks on the dipstick. If it is low, add a small amount and recheck.
Clean up your workspace. Wipe down any spilled oil and properly store your used oil and filter. Never pour old oil down a drain or onto the ground. Take it to a recycling center or an auto parts store that accepts used oil.
Choosing the Right Oil for Your Vehicle
Synthetic vs Conventional Oil
One of the most common questions beginners ask is whether to use synthetic or conventional oil. Synthetic oil is chemically engineered for superior performance. It flows smoothly in cold weather, resists breakdown at high temperatures, and lasts longer between changes. If you drive in extreme heat or cold, synthetic oil is a great choice.
Conventional oil is refined from crude oil and works well for most daily driving conditions. It is more affordable and perfectly suitable for vehicles with standard driving patterns. If you are unsure which type your car needs, check your owner’s manual or consult a trusted mechanic.
Some vehicles also accept synthetic blend oil, which combines the benefits of both types. It offers better protection than conventional oil at a lower price than full synthetic. This can be a good middle ground for budget-conscious car owners.
Understanding Oil Viscosity Ratings
Oil viscosity is printed on every oil bottle as a number followed by a letter and another number, like 5W-30. The first number indicates how the oil flows in cold temperatures. A lower number means the oil flows more easily when the engine is cold. The second number measures thickness at operating temperature.
Using the wrong viscosity can reduce engine protection and fuel efficiency. Always follow your manufacturer’s recommendation. If you live in an area with very cold winters, a lower first number like 0W or 5W can help your engine start more easily.
When to Consider High-Mileage Oil
If your vehicle has over 75,000 miles on the odometer, consider switching to high-mileage oil. This type contains additives that help reduce oil consumption and seal minor leaks. It is designed specifically for engines that have accumulated more wear over time. Switching to high-mileage oil can extend the life of an older engine.
Common Mistakes to Avoid
Overtightening the Drain Plug
One of the most frequent mistakes beginners make is overtightening the drain plug. This can strip the threads or crack the oil pan, leading to expensive repairs. Always use a torque wrench and follow the manufacturer’s specification. If you are unsure of the correct torque value, check your owner’s manual or look it up online.
Forgetting to Replace the Oil Filter
Some people think they can skip the oil filter and just add new oil. This is a bad idea. The old filter contains contaminants that can contaminate your fresh oil. Always replace the oil filter with every oil change. A new filter ensures your engine stays clean and well-protected.
Using the Wrong Oil Type
Using the wrong oil type can cause serious engine damage over time. Do not assume any oil will work. Always match the oil type, viscosity, and specification to your vehicle. If you are unsure, ask a professional or refer to your owner’s manual for guidance.
Skipping the Oil Level Check
After completing the oil change, many people forget to check the oil level. Driving with too little oil can cause engine damage. Always verify the level using the dipstick before driving. If the level is low, add oil gradually and recheck until it is in the proper range.
Improper Disposal of Used Oil
Used motor oil is a hazardous material and should never be disposed of improperly. Pouring it down a drain or onto the ground harms the environment and can result in fines. Always take your used oil to a recycling center, auto parts store, or designated collection facility for safe disposal.
How Often Should You Change Your Oil?
The traditional recommendation was to change oil every 3,000 miles. However, modern engines and improved oils have changed that. Many newer vehicles can go 5,000 to 7,500 miles between changes. Some vehicles with synthetic oil can even go 10,000 miles or more. The key is to follow your manufacturer’s recommendation in the owner’s manual.
Your driving habits also play a role. If you frequently drive in stop-and-go traffic, tow heavy loads, or operate in extreme temperatures, you may need to change your oil more often. These conditions are considered severe driving and can shorten the life of your oil.
If you are not sure how often to change your oil, a good rule of thumb is every 5,000 miles or six months, whichever comes first. Staying consistent with your oil change interval is one of the best things you can do for your engine’s longevity.
Regular oil changes also help you tell if your car is low on oil between service intervals, keeping your engine properly lubricated at all times.
Conclusion
Learning how to change car oil is a valuable skill that every car owner should have. It saves you money, builds your mechanical knowledge, and gives you confidence in maintaining your vehicle. With the right tools, the correct oil, and a little patience, you can complete the job in under an hour.
Start with your first oil change using this guide, and you will be surprised at how simple it really is. Once you have done it a couple of times, the process becomes second nature. You will wonder why you ever paid someone else to do it. Take your time, follow each step carefully, and enjoy the satisfaction of keeping your car in great shape with your own hands.
Remember to dispose of your used oil properly and keep track of your next service date. Consistent maintenance is the key to a long-lasting, reliable vehicle. Happy wrenching.
Frequently Asked Questions
Can I Change My Oil Without a Lift or Jack Stands?
Yes, you can change oil on a level surface without a lift, but you need to safely raise the front of the car. Use a hydraulic jack and place jack stands under the frame. Never work under a car supported only by a jack. Jack stands provide the stability you need to stay safe while draining the oil.
How Long Does It Take to Change Car Oil for the First Time?
For a first-time oil change, plan on about 45 minutes to an hour. You will need to gather your supplies, lift the car, drain the old oil, replace the filter, add new oil, and check for leaks. With practice, you can complete the job in about 30 minutes.
Can I Use Synthetic Oil if My Car Manual Recommends Conventional Oil?
Yes, you can switch to synthetic oil even if your manual recommends conventional oil. Synthetic oil offers better protection and lasts longer. However, always check your owner’s manual for the correct viscosity grade. Switching oil types will not harm your engine as long as you use the proper specification.
What Happens If I Overfill My Engine with Oil?
Overfilling can cause the oil to foam, reducing its lubrication ability. It can also lead to increased pressure inside the engine, which may damage seals or cause oil leaks. If you accidentally overfill, drain the excess oil to bring the level back to the proper range on the dipstick.
Is It Better to Change Oil by Mileage or by Time?
Both matter. Oil degrades over time even if you do not drive many miles. A good practice is to change your oil every 5,000 miles or six months, whichever comes first. If you drive infrequently, stick to the time-based interval to ensure your engine stays properly protected.
Do I Need to Reset the Oil Change Reminder After Changing Oil Myself?
Yes, most vehicles have an oil change counter that needs to be reset after each service. The process varies by vehicle, but it is usually found in the dashboard settings or trip meter menu. Refer to your owner’s manual for the specific reset procedure for your model.