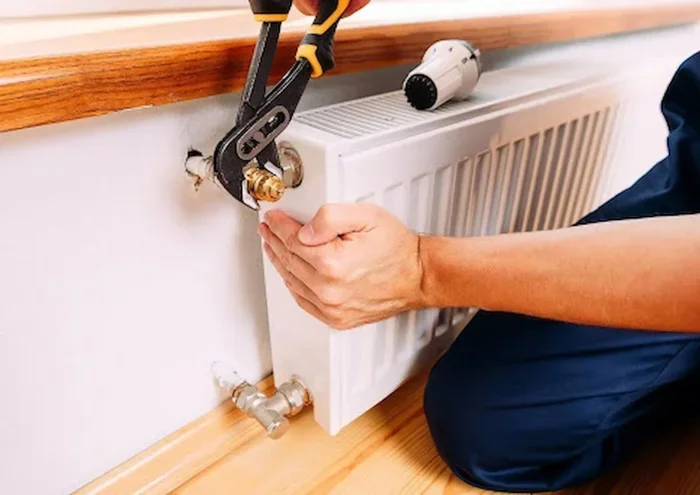
Can I Replace My Radiator Myself Without Calling a Pro
Yes, you can replace your radiator yourself if you have basic tools and follow the right steps. This guide covers everything from choosing the right radiator replacement to safely draining your central heating system. Learn how to save money and tackle this DIY plumbing project with confidence.
So, can I replace my radiator myself? The short answer is yes. Many homeowners tackle radiator replacement every year without calling a single plumber. If you can change a light fixture or assemble flat-pack furniture, you can handle this job too.
Replacing an old radiator is one of the most satisfying DIY plumbing projects you can do. It saves money, teaches you new skills, and gives you full control over the look and type of new radiator you install. Whether you want a sleek column radiator, a compact towel radiator, or a powerful double panel radiator, the process is very similar.
In this guide, we walk you through every step. You will learn what tools you need, how to drain your central heating system, and how to fit your new unit safely. We also cover the most common mistakes to avoid and tips from real experts. By the end, you will feel ready to grab your pipe wrench and get started.
Key Takeaways
- Replacing a radiator yourself is doable: Most homeowners with basic DIY skills can handle a radiator replacement in a few hours.
- You need the right tools: A pipe wrench, radiator bleed key, and isolation valve are essential for a smooth job.
- Safety comes first: Always turn off your central heating system and let the water cool before starting any work.
- Choosing the right size matters: Measure your space carefully to pick the perfect radiator size for your room.
- Common mistakes can be avoided: Over-tightening fittings and forgetting to bleed the new radiator are the top errors to watch for.
- You can save hundreds of dollars: DIY radiator replacement eliminates labor costs from a professional plumber.
📑 Table of Contents
- Why Replace Your Radiator Yourself?
- Tools and Materials You Will Need
- Step-by-Step Guide to Replacing Your Radiator
- Common Mistakes to Avoid
- How to Choose the Right Radiator for Your Home
- When Should You Call a Professional Instead?
- Benefits of a Successful DIY Radiator Swap
- Final Thoughts on Replacing Your Radiator Yourself
Why Replace Your Radiator Yourself?
Save Money on Labor Costs
Hiring a professional to swap out a radiator replacement unit can cost anywhere from 150 to 400 dollars or more. That is just for labor. When you do it yourself, you only pay for the new new radiator and any fittings you might need. Over time, these savings add up fast.
Learn a Valuable Skill
Every DIY plumbing job you complete builds your confidence. Once you know how to drain pipes, fit pipe fittings, and manage water pressure, you can handle other home repairs too. Central heating maintenance becomes much less intimidating when you have hands-on experience.
Choose Exactly What You Want
When a plumber does the job, they often suggest what they stock or what is easiest. By doing it yourself, you pick the exact radiator size, style, and color you love. Want a stylish towel radiator in your bathroom? Go for it. Prefer a classic column radiator in the living room? No problem.
Tools and Materials You Will Need
Before you start, gather everything you need. Having all your tools ready makes the job smoother and faster. Here is a complete list for a successful radiator replacement project.
Essential Tools
- Pipe wrench – for loosening and tightening pipe connections
- Radiator bleed key – needed to release air from the new unit
- Screwdriver set – both flathead and Phillips head types
- Adjustable spanner – helps with various fitting sizes
- Bucket or basin – to catch water when draining the system
- Rags or towels – for wiping up spills and drips
- Spirit level – ensures your new radiator sits straight on the wall
- Drill with wall plugs – for securing radiator brackets
Materials to Buy
- New radiator – sized correctly for your room
- Radiator valves – match the type on your existing unit
- Thermostatic radiator valve – helps control room temperature
- Isolation valve – lets you shut off water to one radiator
- Pipe connectors and seals – prevent leaks at connection points
- Wall brackets – usually included with the new radiator
- Power flush solution – optional but recommended for dirty systems
Quick Tip: Turn off your central heating system at least 2 hours before you start. Let the water cool completely. Hot water can cause burns and make the job much messier.
Step-by-Step Guide to Replacing Your Radiator
Now for the part you have been waiting for. Here is the full process for can I replace my radiator myself projects. Follow these steps carefully, and your radiator replacement will go smoothly.
Step 1: Turn Off the Heating and Water Supply
First, switch off your boiler and let the system cool. Find the isolation valve on the pipes connected to your old radiator. Turn it clockwise to close the valve. This stops water from flowing into the unit while you work.
Step 2: Drain the Radiator
Place your bucket underneath the radiator valves. Use your pipe wrench to loosen the valve fittings. Water will start to flow out, so be ready. Let the old radiator drain completely before moving to the next step.
Step 3: Remove the Old Radiator
Once drained, disconnect the remaining pipe connections. Carefully lift the old radiator off the wall brackets. Radiator brackets can be stubborn, so use your screwdriver to remove any screws holding them in place. Have a helper for this step — old radiator units can be surprisingly heavy.
Step 4: Prepare the Wall and New Radiator
Check the wall for any damage or debris. Clean the area where the new radiator will sit. If the wall is uneven, use a spirit level to mark the correct position for your wall brackets. Drill holes and insert wall plugs before fitting the brackets securely.
Step 5: Install the New Radiator
Lift your new radiator onto the wall brackets. Make sure it sits level and is firmly attached. Connect the pipe fittings to the valves, tightening them with your pipe wrench. Do not over-tighten — snug is enough to prevent leaks without damaging the fittings.
Step 6: Fill the System and Bleed the Radiator
Slowly open the isolation valve to let water back into the central heating system. Check all connections for leaks. Once the system is full, use your radiator bleed key to open the bleed valve at the top. You will hear a hissing sound as air escapes. Close the valve once water starts to drip out.
Step 7: Test the System
Turn your boiler back on and set the thermostat. Check that the new radiator heats up evenly from top to bottom. Feel for any cold spots, which might mean there is still air inside. If needed, bleed the radiator again until it heats completely.
Common Mistakes to Avoid
Even experienced DIYers make slip-ups. Knowing what goes wrong helps you avoid the same pitfalls during your radiator replacement project.
Over-Tightening Pipe Fittings
It is tempting to crank down on every bolt. But over-tightening can crack fittings or strip threads. Tighten until snug, then give it just a quarter turn more. If you see water seeping, stop and re-check the seal.
Forgetting to Bleed the New Radiator
Air trapped inside a new radiator creates cold spots and reduces heating efficiency. Always bleed the unit after installation. This simple step makes a huge difference in how well your central heating system performs.
Choosing the Wrong Size
Not all radiator size options are equal. A radiator that is too small will struggle to heat your room. One that is too large wastes energy. Use a radiator size calculator based on your room dimensions, insulation level, and window size.
Ignoring Water Pressure
Your heating system relies on proper water pressure to work correctly. After installation, check the pressure gauge on your boiler. If it is too low, the system will not circulate heat properly. If it is too high, you risk damaging pipes and fittings.
Expert Insight: A power flush before installing a new radiator can remove sludge and debris from your central heating system. This extends the life of your new unit and improves overall system efficiency. Many professionals recommend this step for systems that are 10 years or older.
How to Choose the Right Radiator for Your Home
Picking the right new radiator is just as important as the installation itself. The wrong type or size can lead to poor heating and higher energy bills. Here is what to consider.
Consider the Room Size
Measure your room in length, width, and height. Larger rooms need more heat output. A small bathroom might only need a compact towel radiator, while a large living room benefits from a powerful double panel radiator or a tall column radiator.
Think About the Style
Radiators come in many designs today. You can choose a modern flat-panel look, a classic Victorian-style column radiator, or a practical heated towel rail for the bathroom. Your radiator replacement should complement your home decor while delivering strong heat output.
Check the Material
Most modern radiators are made from steel or aluminum. Steel radiators heat up slowly but retain warmth longer. Aluminum radiators heat up fast but cool down quickly. Both are excellent choices for DIY plumbing projects.
Match the Valve Type
Check what type of valves your current old radiator uses. Common types include straight valves, angle valves, and thermostatic radiator valves. Matching the valve type on your new radiator makes installation much easier and avoids extra plumbing work.
When Should You Call a Professional Instead?
While can I replace my radiator myself is a question with a confident yes for most people, some situations call for a professional. Knowing when to call for help keeps your home safe and your heating system running properly.
If your central heating system uses old copper pipes that are corroded or brittle, a plumber may handle them more safely. Similarly, if you discover significant water pressure problems or a faulty thermostatic radiator valve during the job, it is wise to seek expert help. Also, if the pipe fittings on your system are soldered rather than compressed, the removal process becomes much more complex.
Another good time to call a professional is when you are replacing multiple radiators at once. A power flush of the entire system is usually recommended in this case, and a certified engineer has the right equipment to do it safely. Remember, there is no shame in asking for help when a task feels beyond your comfort zone.
Benefits of a Successful DIY Radiator Swap
Completing a radiator replacement on your own brings real rewards. Beyond the obvious cost savings, you gain practical knowledge that serves you for years. Each job you do makes the next one easier and faster.
You also gain control over the quality of materials and the precision of the installation. No guessing whether the plumber used the right fittings or took shortcuts. When you do it yourself, you know exactly how the job was done. This peace of mind is invaluable, especially when it comes to something as important as your central heating system.
Finally, a successful DIY plumbing project boosts your confidence. You prove to yourself that you can handle real home maintenance tasks. This mindset carries over into other projects, saving you money and keeping your home in great shape year-round.
Final Thoughts on Replacing Your Radiator Yourself
So, can I replace my radiator myself? Absolutely. With the right tools, a little patience, and this guide, you can complete a radiator replacement in just a few hours. The process is straightforward once you understand each step, from draining the old radiator to bleeding the new radiator and testing the system.
Remember to take your time, follow safety precautions, and never rush the job. A careful DIY plumbing project delivers professional-quality results without the professional price tag. Your central heating system will run better, your rooms will be warmer, and your wallet will be happier.
Now that you know how to handle a radiator replacement yourself, there is nothing stopping you from starting this weekend. Gather your tools, pick out your new radiator, and enjoy the satisfaction of a job well done.
Frequently Asked Questions
How long does it take to replace a radiator yourself?
Most homeowners complete a radiator replacement in 2 to 4 hours. The time depends on your experience level, the complexity of the pipe connections, and whether you need to flush the system first. If everything goes smoothly, you could be done in a single afternoon.
Do I need any special qualifications to replace a radiator?
No special qualifications are needed for a basic radiator replacement. This is considered a straightforward DIY plumbing task. However, if your system involves soldered copper pipes or gas boiler work, you may need a certified professional by law in some regions.
Can I reuse the old radiator brackets?
You can reuse brackets if they are in good condition and match the size of your new radiator. Check for rust, bends, or damage before reusing them. New radiator brackets are inexpensive and ensure a secure fit for your new radiator.
What size radiator do I need for my room?
The right radiator size depends on your room dimensions, insulation, and number of windows. A general rule is to calculate the room’s BTU requirement and choose a radiator that meets or slightly exceeds that output. Many online calculators can help you find the perfect fit for your space.
Is it normal for the new radiator to have cold spots?
Cold spots usually mean trapped air inside the new radiator. Bleeding the radiator with a radiator bleed key releases the air and allows hot water to circulate fully. If cold spots persist after bleeding, the system may need a power flush to remove sludge buildup.
Should I turn off the water supply to the whole house?
No, you only need to close the isolation valve on the pipes connected to the radiator you are replacing. This shuts off water flow to that single unit without affecting the rest of your central heating system. Always double-check that the valve is fully closed before starting work.
=== CONCLUSION ===
Replacing your radiator yourself is one of the most rewarding DIY plumbing projects you can tackle. You save money, gain valuable skills, and end up with a new radiator that fits your style and heating needs perfectly. The process is simpler than most people think, and with the steps outlined in this guide, you are well-prepared to succeed.
Remember that can I replace my radiator myself is not just a question — it is an invitation to take charge of your home maintenance. With the right tools, a new radiator you love, and a little patience, you can transform your central heating system without ever picking up the phone to call a plumber.
Start small, stay safe, and enjoy the process. Your future self — and your wallet — will thank you for it.




One Comment