Car Headlight Wiring Kit Guide for Easy Installation
A car headlight wiring kit makes upgrading or replacing your headlights simple, safe, and hassle-free. This guide covers everything from what a wiring kit contains to a full step-by-step installation process. You will learn how to pick the right kit, avoid common mistakes, and keep your headlight wiring in top shape for years to come.
A car headlight wiring kit is one of the simplest upgrades you can make to your vehicle. Whether you are swapping out old halogen bulbs for LEDs or just fixing a flickering headlight, the right wiring kit makes all the difference.
So, what exactly is a car headlight wiring kit? In simple terms, it is a collection of wires, connectors, relays, and sometimes a control module that helps deliver clean, stable power to your headlights. Instead of relying on the factory wiring, which can be thin and overloaded, a wiring kit gives your headlights a dedicated power source.
Why does this matter? Factory headlight wiring was designed for the original bulbs. When you upgrade to brighter lights like LED or HID bulbs, the factory wiring often cannot handle the demand. This leads to dimming, flickering, and even damage to your vehicle’s electrical system. A wiring kit solves all of these problems.
In this guide, we will walk you through everything you need to know about a car headlight wiring kit. You will learn what comes inside the kit, why you need one, how to choose the right type, and a full step-by-step installation process. By the end, you will feel confident enough to do the job yourself.
Key Takeaways
- A wiring kit simplifies headlight upgrades: It handles power delivery safely and reduces electrical strain on your vehicle.
- Relay-based kits are the most reliable: They draw power directly from the battery, preventing dimming and overheating.
- Plug-and-play harnesses save time: No cutting or splicing needed, making them perfect for beginners.
- Proper installation prevents common problems: Flickering, dimming, and blown fuses can all be avoided with the right kit and technique.
- Maintenance matters: Regular checks on connectors and wiring keep your headlights performing at their best.
- Choose a kit based on your headlight type: LED, HID, or halogen kits each have specific wiring needs.
📑 Table of Contents
- What Is a Car Headlight Wiring Kit?
- Why You Need a Headlight Wiring Kit
- Types of Car Headlight Wiring Kits
- How to Install a Car Headlight Wiring Kit
- Common Headlight Wiring Problems and How to Fix Them
- Choosing the Right Wiring Kit for Your Vehicle
- Maintenance Tips for Headlight Wiring
- Expert Insights on Headlight Wiring Upgrades
- Key Takeaways
- Conclusion
What Is a Car Headlight Wiring Kit?
A car headlight wiring kit is a pre-assembled set of electrical components designed to power your headlights properly. Think of it as a dedicated highway for electricity to flow from your battery straight to your headlights, bypassing the factory wiring that may be too thin or outdated.
These kits come in different shapes and sizes depending on your vehicle and headlight type. Some are universal and fit many cars, while others are custom-fit for specific makes and models. The goal is the same, though: deliver clean, consistent power to your headlights for the best performance.
How Does a Headlight Wiring Kit Work?
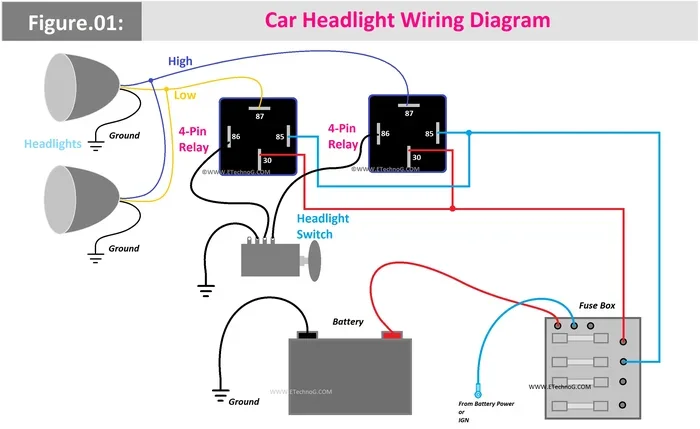
The basic idea behind a headlight wiring kit is simple. Instead of sending power through multiple connections in your car’s factory wiring, the kit pulls power directly from the battery. It uses a relay to switch the power on and off when you turn your headlights on.
A relay acts like a switch that handles a large amount of current. When you flip your headlight switch, the relay closes the circuit and allows power to flow. This means your headlight switch and factory wiring only handle a small amount of current, while the relay handles the heavy lifting.
This setup has several big advantages. Your headlights get full voltage, which means they shine brighter. The factory wiring stays cool because it is not carrying heavy loads. And your headlights turn on instantly without any delay or flickering.
What Is Inside a Typical Wiring Kit?
Most car headlight wiring kits come with similar components. Here is a list of what you will typically find inside the box:
- Relay: The main switch that controls power flow to the headlights.
- Wiring harness: Pre-cut wires with connectors that run from the battery to the headlights.
- Connectors and adapters: Plugs that connect to your existing headlight sockets without cutting wires.
- Fuse and fuse holder: Protects the circuit from overloads and short circuits.
- Ground wire: Ensures a safe path for electricity to return to the battery.
- Mounting hardware: Brackets or ties to secure the relay and wires in place.
- Instruction manual: Step-by-step guide specific to your vehicle or a universal setup.
Some kits also include a wiring diagram or a quick-start guide. These are very helpful, especially if you have never done any electrical work on your car before. The diagram shows you exactly where each wire goes, so there is no guessing involved.
Why You Need a Headlight Wiring Kit
You might wonder, do you really need a wiring kit? If your headlights work fine right now, maybe not. But if you are planning any kind of headlight upgrade, a wiring kit becomes almost essential. Let us look at the main reasons why.
Safety Benefits
Safety should always come first when working on your car’s electrical system. The factory wiring in many vehicles was not designed to handle high-power bulbs. Running too much current through thin wires can cause them to overheat. Over time, this can melt insulation, damage connectors, or even cause a fire.
A headlight wiring kit reduces this risk significantly. The relay handles the heavy current, and the thicker wires in the kit are built to handle the load safely. The fuse provides an extra layer of protection. If anything goes wrong, the fuse blows instead of damaging your wiring or your vehicle.
Beyond electrical safety, better-performing headlights also improve driving safety. When your headlights shine bright and clear, you can see the road better at night. This reduces the risk of accidents and keeps you and your passengers safer.
Performance Improvements
One of the biggest benefits of using a wiring kit is improved headlight performance. When you upgrade to LED or HID bulbs without a wiring kit, you might notice the headlights dim when you hit the brakes or turn on the air conditioning. This happens because the factory wiring cannot supply enough power.
A wiring kit fixes this problem. Because the relay pulls power directly from the battery, your headlights get a steady and full supply of voltage. This means:
- Brighter light output on the road
- No dimming when other electrical systems are in use
- Instant full brightness when you turn on the lights
- Longer bulb life because of stable power delivery
- No flickering or buzzing from the headlights
These improvements are especially noticeable with LED and HID conversions. These bulb types need more power than standard halogen bulbs, and a wiring kit ensures they get exactly what they need.
Types of Car Headlight Wiring Kits
Not all wiring kits are the same. Different kits are designed for different headlight types and vehicle setups. Understanding the main types will help you choose the right one for your car.
Relay-Based Wiring Kits
Relay-based kits are the most popular and reliable option for a car headlight wiring kit. These kits use one or more relays to control power flow to the headlights. The relay sits between the battery and the headlights, and it is controlled by the headlight switch in your car.
Relay-based kits work well for almost all headlight types, including halogen, LED, and HID. They are especially useful when upgrading to higher-wattage bulbs. The relay can handle the extra current without any problem, and the factory wiring stays cool and safe.
Most relay kits come with a wiring diagram that shows you how to connect everything. The installation is straightforward and usually takes about 30 to 60 minutes. If you are comfortable using basic hand tools, you can handle this job yourself.
Plug-and-Play Wiring Harnesses
Plug-and-play harnesses are designed for people who want the easiest possible installation. These kits come with pre-connected connectors that plug directly into your existing headlight sockets. There is no cutting, no splicing, and no soldering required.
Plug-and-play kits are great for beginners. They are also reversible, meaning you can remove them and go back to the factory setup anytime. However, they may not provide the same level of performance improvement as a full relay kit. The factory wiring still carries some of the current, which can limit brightness in some cases.
These harnesses are often sold as specific-fit kits for certain vehicle models. This means they come with connectors that match your car exactly, making the installation even easier.
CAN-Bus Compatible Kits
If you have a modern vehicle, you may need a CAN-bus compatible wiring kit. Many newer cars use a CAN-bus system that monitors the electrical load on each circuit. When you swap in LED bulbs without a CAN-bus decoder, the car’s computer may throw an error or cause the headlights to flicker.
CAN-bus wiring kits include a decoder or error-free module that tricks the car’s computer into thinking the headlights are drawing the correct amount of power. This prevents error messages and flickering, giving you a smooth and hassle-free upgrade.
These kits are slightly more expensive than standard options, but they are essential for vehicles with CAN-bus systems. Always check your vehicle’s manual or consult a mechanic to see if your car needs this type of kit.
How to Install a Car Headlight Wiring Kit
Installing a car headlight wiring kit is easier than most people think. You do not need to be a professional mechanic to do it. With the right tools and a little patience, you can complete the installation in about an hour.
Tools You Will Need
Before you start, gather the following tools:
- Wire stripper and crimping tool
- Electrical tape or heat shrink tubing
- Multimeter (optional but helpful)
- Phillips and flathead screwdrivers
- Wire connectors and zip ties
- Owner’s manual for your vehicle
Having these tools ready before you start will make the process much smoother. You do not want to stop halfway through to find a missing tool.
Step-by-Step Installation Guide
Follow these steps for a clean and safe installation of your headlight wiring kit:
- Disconnect the battery: Always start by disconnecting the negative terminal of your battery. This prevents any electrical shorts while you are working.
- Locate the headlight wiring: Open the hood and find the back of the headlight assembly. Identify the existing wiring and connectors.
- Mount the relay: Find a suitable spot near the battery or firewall to mount the relay. Use the included bracket or zip ties to secure it in place.
- Connect the power wire: Run the main power wire from the battery to the relay. Use a fuse holder close to the battery for safety.
- Connect the ground wire: Attach the ground wire to a clean metal surface on the car chassis. This provides a safe return path for the electricity.
- Connect the headlight output wires: Run the wires from the relay to the headlight sockets. Use the provided connectors to plug into the existing sockets.
- Connect the trigger wire: Run a thin wire from the headlight switch to the relay. This tells the relay to turn on when you switch on the headlights.
- Reconnect the battery: Once everything is connected, reconnect the battery terminal.
- Test the headlights: Turn on the headlights and check both high and low beams. Make sure everything works correctly and there are no flickering issues.
Take your time with each step. If something does not feel right, stop and double-check your connections. It is always better to be safe than sorry when working with electricity.
Quick Tips for a Smooth Installation
- Use heat shrink tubing on all wire connections for a clean and waterproof finish.
- Route wires away from moving parts like belts and fans.
- Label each wire with tape before disconnecting anything from the factory wiring.
- Use a multimeter to verify voltage at each connection point.
- Do not overload the circuit by connecting too many accessories to the same wiring kit.
Common Headlight Wiring Problems and How to Fix Them
Even with a wiring kit, you may run into some common headlight wiring problems. Most of these issues are easy to diagnose and fix with basic troubleshooting.
Flickering Headlights
Flickering headlights are one of the most common complaints after a headlight upgrade. The most frequent cause is a poor ground connection. If the ground wire is not making solid contact with the chassis, the electrical current can fluctuate, causing the lights to flicker.
To fix this, clean the ground connection point with sandpaper or a wire brush. Make sure the connection is tight and free of rust or paint. If you are using LED bulbs, a CAN-bus decoder may also solve flickering issues in modern vehicles.
Dimming Headlights
If your headlights are dim even after installing a wiring kit, the problem is usually related to voltage drop. This happens when the wires are too long, too thin, or the connections are corroded.
Check all wire connections for corrosion or looseness. Make sure the power wire is thick enough for the wattage of your headlights. A relay harness for headlights should use at least 14-gauge wire for most applications. If the wire is too thin, replace it with a thicker gauge wire.
Blown Fuses
A blown fuse is a sign that something is drawing too much current or there is a short circuit. First, check the fuse rating. It should match the amperage requirements of your headlights. If the fuse is rated too low, it will blow frequently.
If the fuse is the correct rating, look for exposed wires or connections that might be touching the metal body of the car. Any exposed wire can cause a short circuit and blow the fuse. Use electrical tape or heat shrink tubing to cover all connections securely.
Choosing the Right Wiring Kit for Your Vehicle
Picking the right headlight wiring kit for your car can feel overwhelming with so many options on the market. But the process becomes much easier when you know what to look for.
Start by identifying your headlight type. Are you running halogen, LED, or HID bulbs? Each type has different power requirements, and the wiring kit needs to match. LED kits typically need less power than HID kits, but both benefit greatly from a dedicated wiring setup.
Next, consider your vehicle’s make and model. Some kits are universal and fit many cars, while others are designed for specific vehicles. A vehicle-specific kit will have connectors that match your factory wiring exactly, making installation much simpler.
Also, think about the quality of the components. Look for kits with weather-resistant connectors, heavy-duty relays, and thick gauge wiring. A cheap kit with thin wires and poor connections will not last long and may even cause problems. Investing in a quality wiring harness for car headlights pays off in the long run.
Price is another factor to consider. Basic plug-and-play kits can be found for under 30 dollars, while more advanced relay-based kits with CAN-bus compatibility can cost 80 dollars or more. The right kit depends on your budget and your specific needs.
Maintenance Tips for Headlight Wiring
Once your car headlight wiring kit is installed, a little maintenance goes a long way. Regular checks keep everything working safely and reliably.
Inspect your wiring connections every few months. Look for signs of corrosion, loose connectors, or damaged insulation. Clean any corroded connections with a wire brush and apply dielectric grease to protect against moisture.
Check the fuse periodically. A fuse that has been blown once is more likely to blow again. Replace it with the correct rating and investigate the root cause if it blows frequently.
Keep the wires secure and away from heat sources and moving parts. Use zip ties to keep the wiring harness neatly routed. This prevents wires from rubbing against sharp edges or getting tangled in engine components.
If you notice any changes in headlight performance, such as dimming or flickering, check the wiring kit connections right away. Catching small problems early prevents bigger issues down the road.
Expert Insights on Headlight Wiring Upgrades
Many automotive electricians agree that a headlight wiring kit is the single most important accessory when upgrading your headlights. The factory wiring simply was not designed for modern high-performance bulbs. A dedicated wiring setup ensures your headlights perform at their full potential.
Experts also recommend pairing your wiring kit with a headlight retrofit if you are switching to HID or LED technology. A retrofit adjusts the headlight housing to properly focus the new bulb type, giving you the best beam pattern and visibility.
One tip from seasoned mechanics: always test your headlights on a wall or garage door after installation. This lets you see the beam pattern and make sure both headlights are aimed correctly. Proper aiming not only improves your visibility but also prevents blinding oncoming drivers.
Key Takeaways
- A car headlight wiring kit is essential for any headlight upgrade: It provides safe, stable power and improves performance.
- Relay-based kits are the gold standard: They handle high-wattage bulbs with ease and protect your vehicle’s electrical system.
- Plug-and-play kits are perfect for beginners: No cutting or splicing required, and they are fully reversible.
- CAN-bus kits are necessary for modern vehicles: They prevent error messages and flickering in cars with advanced electrical systems.
- Installation is straightforward: With basic tools and about an hour of time, you can upgrade your headlights yourself.
- Regular maintenance keeps everything working: Check connections, clean corroded terminals, and inspect fuses periodically.
- Choose quality over price: A well-made wiring kit lasts longer and performs better than a cheap alternative.
Conclusion
A car headlight wiring kit is one of the smartest upgrades you can make to your vehicle. Whether you are improving safety, boosting brightness, or simply fixing a flickering headlight, the right wiring kit makes the job easy and effective.
The installation process is straightforward enough for most car owners to handle themselves. With the right tools, a little patience, and this guide, you can have your headlights performing better than ever in just about an hour.
Remember to choose a kit that matches your headlight type and vehicle model. Take your time during installation, and do not skip the maintenance steps once everything is in place. Your headlights are your eyes on the road at night, and giving them the best wiring setup ensures they will serve you well for many miles to come.
So go ahead, grab a headlight wiring kit, and give your car the upgrade it deserves. Your future self, driving safely on dark roads, will thank you.
Frequently Asked Questions
Can I install a car headlight wiring kit myself?
Yes, most wiring kits are designed for DIY installation. You only need basic tools like a screwdriver, wire stripper, and a multimeter. The process typically takes about 30 to 60 minutes, and most kits come with detailed instructions to guide you through each step.
Will a wiring kit make my headlights brighter?
A wiring kit itself does not change the bulb, but it ensures your headlights receive full and stable voltage. This means your existing bulbs will perform at their best. When combined with an upgrade to LED or HID bulbs, the brightness improvement is even more dramatic.
How do I know if my car needs a CAN-bus wiring kit?
If your vehicle is a modern car made after 2005, there is a good chance it uses a CAN-bus system. Signs that you need a CAN-bus kit include flickering headlights after a bulb swap, error messages on the dashboard, or headlights that turn off unexpectedly. Check your vehicle’s manual or ask a mechanic to confirm.
What gauge wire should a headlight wiring kit use?
For most headlight applications, 14-gauge to 12-gauge wire is recommended. Thicker wire (lower gauge number) carries more current with less resistance. A quality wiring kit will specify the wire gauge, and you should always match it to the wattage of your headlights.
How long does a headlight wiring kit last?
A well-made wiring kit can last the lifetime of your vehicle. The relay is a durable mechanical component, and the wiring is designed to withstand engine heat and vibration. Regular maintenance, such as checking connections and cleaning corroded terminals, helps extend the lifespan even further.
Is it safe to drive with a newly installed wiring kit?
Yes, it is completely safe as long as the installation is done correctly. Always test the headlights before driving, make sure all connections are secure, and verify that the fuses are the correct rating. If you notice any unusual behavior, such as dimming or flickering, check the connections before driving at night.