DIY Auto Window Tint Installation Guide for Beginners
DIY auto window tint installation is easier than most people think, and this guide walks you through every step with confidence. You will learn how to choose the right tint film, prep your windows, and apply the tint bubble-free. Our tips help you avoid common mistakes and save hundreds compared to professional shops. By the end, you will have the skills to tint your car windows like a pro.
Key Takeaways
- Choose the Right Kit: Pick a quality window tinting kit that matches your climate and legal requirements.
- Prep Is Everything: Proper window cleaning and trimming make or break your final result.
- Use the Right Tools: A squeegee, spray bottle, and heat gun are essential for a smooth application.
- Know the Laws: Legal tint limits vary by state, so check your local visible light transmission rules before buying.
- Patience Pays Off: Take your time during bubble-free application to avoid re-dos and peeling.
- Save Big: DIY auto window tint installation can save you 50-70% compared to professional shops.
- Heat Rejection Matters: The right tint percentage reduces interior heat and protects your car’s interior from UV damage.
📑 Table of Contents
- Why DIY Auto Window Tint Installation Is Worth Your Time
- Choosing the Right Tint Film for Your Car
- Tools and Materials You Will Need
- Preparing Your Windows for Tinting
- Step-by-Step Application Process
- Common Mistakes to Avoid
- Benefits of Tinted Windows Beyond Looks
- How Long Does the Tint Last?
- Final Tips for a Perfect Finish
- Conclusion
Why DIY Auto Window Tint Installation Is Worth Your Time
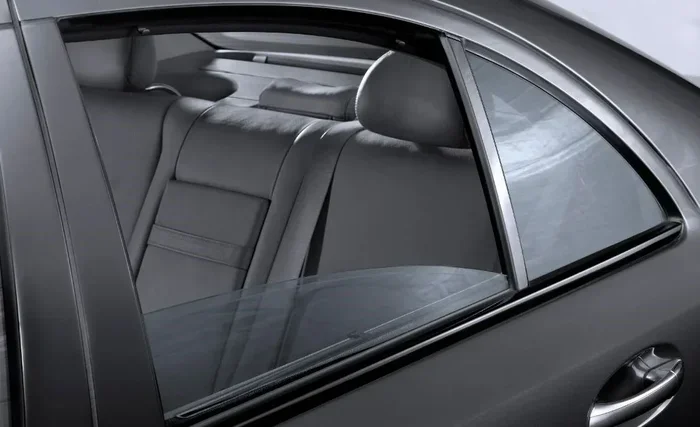
Tinted windows make a car look better instantly. They also reduce glare, block harmful UV rays, and keep your interior cooler on hot days. Most people assume they need to visit an expensive shop for this upgrade. But DIY auto window tint installation is a skill anyone can learn with the right guidance.
Think about how much money professional tinting costs. A full car wrap from a shop can run anywhere from $200 to $600 or more. A quality window tinting kit costs a fraction of that. You get the same materials, and with a little practice, you can achieve stunning results right in your garage.
This guide is built for beginners who have never tinted a window before. We cover every step from choosing your tint film to the final squeegee pass. By the time you finish reading, you will feel ready to tackle the job yourself.
What Makes DIY Tinting So Appealing?
There are several reasons car owners choose to tint their own windows. First, it saves a significant amount of money. Second, you control the quality of the materials. Third, you learn a valuable skill that you can use on future vehicles or even help friends with.
Many beginners worry about making mistakes. That is completely normal. But modern tint film technology has made the process much more forgiving. Pre-cut kits, heat shrink film, and improved adhesives all help first-timers get great results.
The key is preparation. If you take the time to clean your windows properly and follow each step carefully, your DIY auto window tint installation will look professional. Let us dive into the details.
Choosing the Right Tint Film for Your Car
Not all tint films are the same. Before you start any DIY auto window tint installation, you need to pick the right product. Your choice affects heat rejection, UV protection, and how dark your windows look.
Understanding Tint Percentages
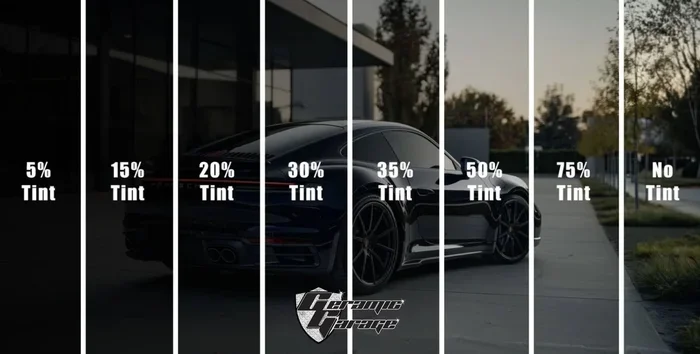
The tint percentage refers to how much light the film allows through. A 5% tint, also called limo tint, lets in very little light. A 50% tint lets in about half the light. Most people choose somewhere in between for a good balance of style and function.
Here is a quick breakdown of common options:
- 5-20% tint: Very dark. Great for privacy and heat rejection. But it can be too dark for safe driving at night.
- 25-35% tint: Medium darkness. A popular choice for a sleek look while still allowing good visibility.
- 40-50% tint: Light tint. Offers UV protection and some heat reduction without darkening the glass too much.
- 70%+ tint: Nearly clear. Best for people who want subtle UV protection without changing the look of their car.
Types of Tint Film
There are several types of car window tint to consider. Each has its own pros and cons.
Dyed film is the most affordable option. It absorbs heat and looks good, but it can fade over time. Metalized film contains tiny metallic particles that reflect heat. It is more durable but can interfere with cell phone signals. Carbon film offers excellent heat rejection without signal interference. Ceramic film is the premium choice. It blocks the most heat and UV rays while staying completely clear of metallic particles.
For most beginners doing DIY auto window tint installation, a quality dyed or carbon film works great. It is affordable and easy to work with. If your budget allows, ceramic film delivers the best long-term performance.
Check Your Local Laws
Before you buy any tint film, check your state’s legal tint limits. Every state has different rules about how dark you can tint your windows. These rules are based on visible light transmission percentages.
For example, many states allow darker tint on rear windows but require lighter tint on the front side windows. Some states have no tint limit on rear windows at all. Getting caught with illegal tint percentage can result in fines and even a ticket to remove the tint.
Do your research first. A quick online search for your state’s tint laws will save you headaches later. This step is critical before you purchase any car window tint kit.
Tools and Materials You Will Need
Having the right tools makes DIY auto window tint installation much smoother. You do not need a lot of equipment, but each item serves an important purpose.
The Essential Toolkit
Here is what you need before you start:
- Tint film kit: Choose a pre-cut kit sized for your specific vehicle model.
- Squeegee: A hard-edge squeegee pushes water out and smooths the film. This is the most important tool.
- Spray bottle: Fill it with a mixture of water and a few drops of dish soap. This installation solution lets you position the film easily.
- Heat gun or hair dryer: Heat helps the film conform to curved windows. A heat gun works best, but a standard hair dryer can work in a pinch.
- Razor blade or utility knife: For trimming excess film around edges.
- Microfiber cloths: You need these for cleaning windows and wiping away excess solution.
- Glass cleaner: Use a streak-free cleaner to prep your windows before application.
- Tape: Painter’s tape helps hold the film in place while you position it.
Why Each Tool Matters
You might wonder why a squeegee is so important. During DIY auto window tint installation, water gets trapped between the glass and the film. The squeegee pushes that water out toward the edges. Without it, you end up with bubbles and wrinkles.
The spray bottle with soapy water is your best friend too. It gives you time to slide the film into the perfect position before it sticks. This is especially helpful for beginners who need a little extra adjustment time.
Do not skip the heat gun. Curved windows, especially on the front doors, need heat to shrink the film tightly against the glass. Without proper heat shrink film technique, you will see creases and loose spots.
Preparing Your Windows for Tinting
Preparation is the most overlooked step in DIY auto window tint installation. Most beginners rush through cleaning and end up with poor results. Take your time here, and the rest of the process goes much easier.
Deep Clean Your Windows
Start by thoroughly cleaning every window you plan to tint. Use a quality glass cleaner and a microfiber cloth. Wipe in circular motions to remove all dirt, grease, and residue.
Pay special attention to the edges of the glass. Any tiny particle of dust or debris will show up under the tint as a bump or bubble. You want the surface to be perfectly smooth and clean.
Some people also clean the inside of the door frames and weather stripping. This prevents dirt from getting trapped under the edges of the film. Cleanliness is the foundation of a successful bubble-free application.
Trim the Film to Size
If your window tinting kit comes with pre-cut pieces, you may not need to trim much. But it is always good to check the fit before you start applying.
Hold the film up to the window and look for any areas that need adjustment. Use a razor blade or utility knife to carefully trim the edges. Cut small amounts at a time. It is easier to trim a little more off than to fix a piece that is too small.
Remember to account for the weather stripping around your windows. The film needs to sit inside the window channel, not on top of the rubber seal. Proper fit prevents peeling and water leaks.
Work in the Right Environment
Choose a clean, dust-free space for your DIY auto window tint installation. A garage with the door closed works best. Avoid doing this outside on windy days, because dust and debris will land on your wet film.
Temperature matters too. The ideal range is between 60 and 80 degrees Fahrenheit. Too cold, and the film will not conform properly. Too hot, and it will stick too quickly and be hard to reposition.
Step-by-Step Application Process
Now comes the fun part. This is where your preparation pays off. Follow these steps carefully for the best results with your DIY auto window tint installation.
Step 1: Spray the Window
Start by spraying your installation solution generously on the clean window. Make sure the entire surface is wet. The soapy water creates a slippery layer that allows the film to slide into position.
Do not be shy with the spray bottle. If the window is not wet enough, the film will stick in spots and you will not be able to adjust it.
Step 2: Remove the Film from the Liner
Carefully peel the protective liner off the back of the tint film. Hold it by the edges to avoid getting fingerprints on the adhesive side. If the film starts to stick to itself, spray it lightly with your installation solution and gently pull it apart.
This step requires patience. Rushing can cause the film to fold or crease. Take your time and keep the film flat as you remove the liner.
Step 3: Apply the Film to the Window
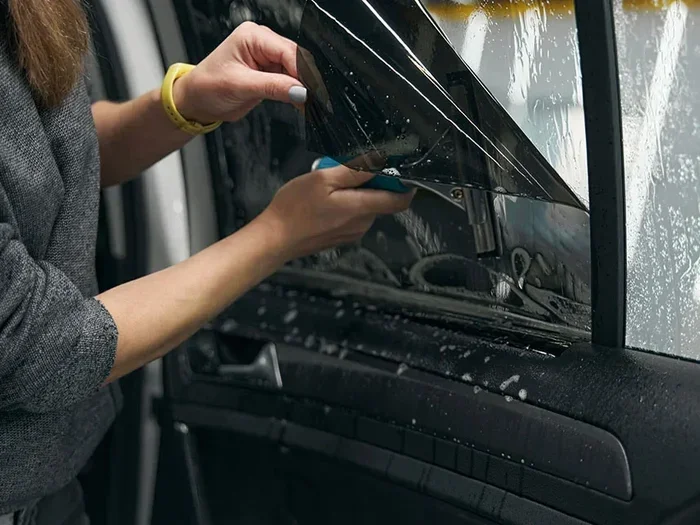
Spray the adhesive side of the film with your soapy water as well. This gives you extra slip time to position it correctly. Place the film onto the wet window, starting from the top edge.
Use your fingers to gently push the film down into the corners and edges. The squeegee comes in next. Hold it at a 30-degree angle and pull it from the center outward. This pushes water and air toward the edges.
Repeat the squeegee process several times. Work out any bubbles or wrinkles as you go. If a bubble is stubborn, lift the film gently and re-squeegee that area.
Step 4: Use Heat to Shrink the Film
Once the film is in place and mostly smooth, use your heat gun or hair dryer to shrink it tightly against the glass. Hold the heat source about six inches from the film and move it slowly across the surface.
The film will shrink as it warms up. This is especially important on curved windows where the film tends to lift in the middle. Keep the heat moving to avoid overheating one spot.
After applying heat, go over the window one more time with the squeegee. You will notice the film gets tighter and smoother. This is the sign of a good application.
Step 5: Trim the Excess
Use your razor blade to carefully trim any excess film hanging over the edges. Run the blade along the edge of the window channel. Be gentle to avoid scratching the glass.
Clean up any remaining water or solution with a microfiber cloth. Let the tint cure for at least 24 hours before rolling down the windows or cleaning the inside of the glass.
Common Mistakes to Avoid
Even with careful preparation, mistakes can happen during DIY auto window tint installation. Knowing what to avoid saves you time and frustration.
Skipping the Cleaning Step
The number one cause of poor tint adhesion is dirty windows. Dust, fingerprints, and grease create bumps under the film. Always clean your windows twice if needed. First, remove loose dirt. Then, do a final wipe with a glass cleaner for a perfectly smooth surface.
Using Too Much Water
Your installation solution is important, but too much of it causes problems. Excess water can get trapped under the film and create large bubbles that are impossible to remove. Use enough to create slip, but not so much that water pools on the glass.
Not Using Enough Heat
Curved windows need proper heat application. If you skip this step, the film will not conform to the shape of the glass. You will end up with loose areas, creases, and eventually tint peeling at the edges.
Rushing the Curing Process
After your DIY auto window tint installation is complete, give it time to cure. The adhesive needs 24 to 48 hours to fully bond to the glass. During this time, avoid rolling down your windows, wiping the inside of the tinted surface, or putting any pressure on the film.
You might notice some water pockets or haze right after application. This is completely normal. As the film cures, these will clear up on their own. Do not try to fix them during this period.
Ignoring Legal Tint Limits
We mentioned this earlier, but it deserves repeating. Ignoring your state’s legal tint limits can lead to fines and mandatory removal. Always verify the visible light transmission requirements for your area before you commit to a specific tint percentage.
Choosing Cheap, Low-Quality Film
It is tempting to buy the cheapest tint film available. But low-quality film fades quickly, bubbles easily, and offers poor UV protection and heat rejection. Investing in a mid-range or premium film pays off in the long run. Your DIY auto window tint installation will look better and last longer.
Benefits of Tinted Windows Beyond Looks
While a sleek, dark look is the most obvious benefit, tinted windows offer much more. Understanding these advantages helps you appreciate the value of your DIY auto window tint installation.
UV protection is a major benefit. Quality tint film blocks up to 99% of harmful UV rays. This protects your skin during long drives and prevents your dashboard, seats, and steering wheel from fading and cracking.
Heat rejection keeps your car cooler in the summer. Without tint, your car’s interior can reach extreme temperatures when parked in the sun. Tinted windows significantly reduce this heat buildup, making your car more comfortable and reducing the load on your air conditioning system.
Privacy and security are additional perks. Tinted windows make it harder for people to see inside your car. This protects your valuables from view and adds a layer of safety for you and your passengers.
Glare reduction makes driving safer, especially during sunrise and sunset. Tinted windows cut down on blinding light from the sun and headlights from other vehicles, reducing eye strain and improving visibility.
How Long Does the Tint Last?
The lifespan of your car window tint depends on the quality of the film and how well it was installed. A quality film, properly applied, can last 5 to 10 years or even longer.
Dyed film tends to fade after 3 to 5 years. Carbon and ceramic films hold up much better and can last the life of the vehicle. The key to longevity is proper bubble-free application and avoiding damage during the curing period.
If you notice tint peeling at the edges after a few years, it usually means the adhesive has worn down. This can happen if the weather stripping around your windows is old or damaged. Replacing the stripping can help extend the life of your tint.
Final Tips for a Perfect Finish
Here are some bonus tips to make your DIY auto window tint installation truly professional-grade:
- Work on one window at a time. Do not try to tint all four windows in one day. Focus on each window individually for the best results.
- Keep a second pair of hands. A friend can help hold the film in position while you squeegee it smooth.
- Use a credit card as a squeegee substitute. If you do not have a professional squeegee, an old credit card wrapped in a microfiber cloth works in a pinch.
- Watch video tutorials. Seeing the process in action helps you understand technique and timing better than reading alone.
- Practice on an old window first. If you are nervous, practice on a spare piece of glass before tackling your car.
- Be patient with bubbles. Small bubbles often disappear as the film cures. Give it time before you try to fix them.
Conclusion
DIY auto window tint installation is one of the most rewarding car care projects you can tackle. It saves money, improves your car’s appearance, and offers real practical benefits like UV protection and heat rejection. With the right tint film, proper tools, and a little patience, anyone can achieve professional-looking results at home.
Remember that preparation is everything. Clean your windows thoroughly, choose the right tint percentage for your needs and local laws, and take your time during application. Avoid the common mistakes we covered, and your tinted windows will look great for years to come.
Start with a practice window if you are nervous. Once you see how satisfying a smooth, bubble-free finish looks, you will want to tint every window in your car. Grab your window tinting kit, follow this guide, and enjoy the results of your hard work. Your car and your wallet will thank you.
Frequently Asked Questions
How long does DIY auto window tint installation take?
Most beginners can tint all the windows of a standard car in about 2 to 3 hours. If you are doing one window at a time, each window takes 30 to 45 minutes. The curing process takes an additional 24 to 48 hours before you can roll down your windows.
Can I tint my windows in cold weather?
It is not ideal, but you can do DIY auto window tint installation in cooler temperatures if you work indoors in a garage. Cold weather makes the film less flexible and harder to conform to curved windows. A heat gun becomes even more important in cold conditions.
Will bubbles go away after tinting?
Small bubbles and water pockets are normal right after application. Most of them disappear as the film cures over 24 to 48 hours. Larger bubbles or persistent wrinkles may need to be lifted and re-squeegeed while the film is still wet.
What is the best tint percentage for a beginner?
A 35% tint is an excellent starting point for beginners. It is dark enough to look great and provide good heat rejection, while still allowing safe visibility for nighttime driving. Always check your local legal tint limits before choosing your tint percentage.
How do I fix tint peeling at the edges?
Edge peeling usually happens when the weather stripping is worn or when the film was not trimmed properly. You can apply a small amount of tint adhesive or use a heat gun to press the edges back down. If peeling is severe, the affected piece may need to be removed and reapplied.
Is DIY tinting cheaper than professional installation?
Yes, DIY auto window tint installation typically saves you 50 to 70% compared to professional shops. A quality window tinting kit costs between $50 and $150 for most vehicles, while professional installation can cost $200 to $600 or more depending on your car and the type of film used.